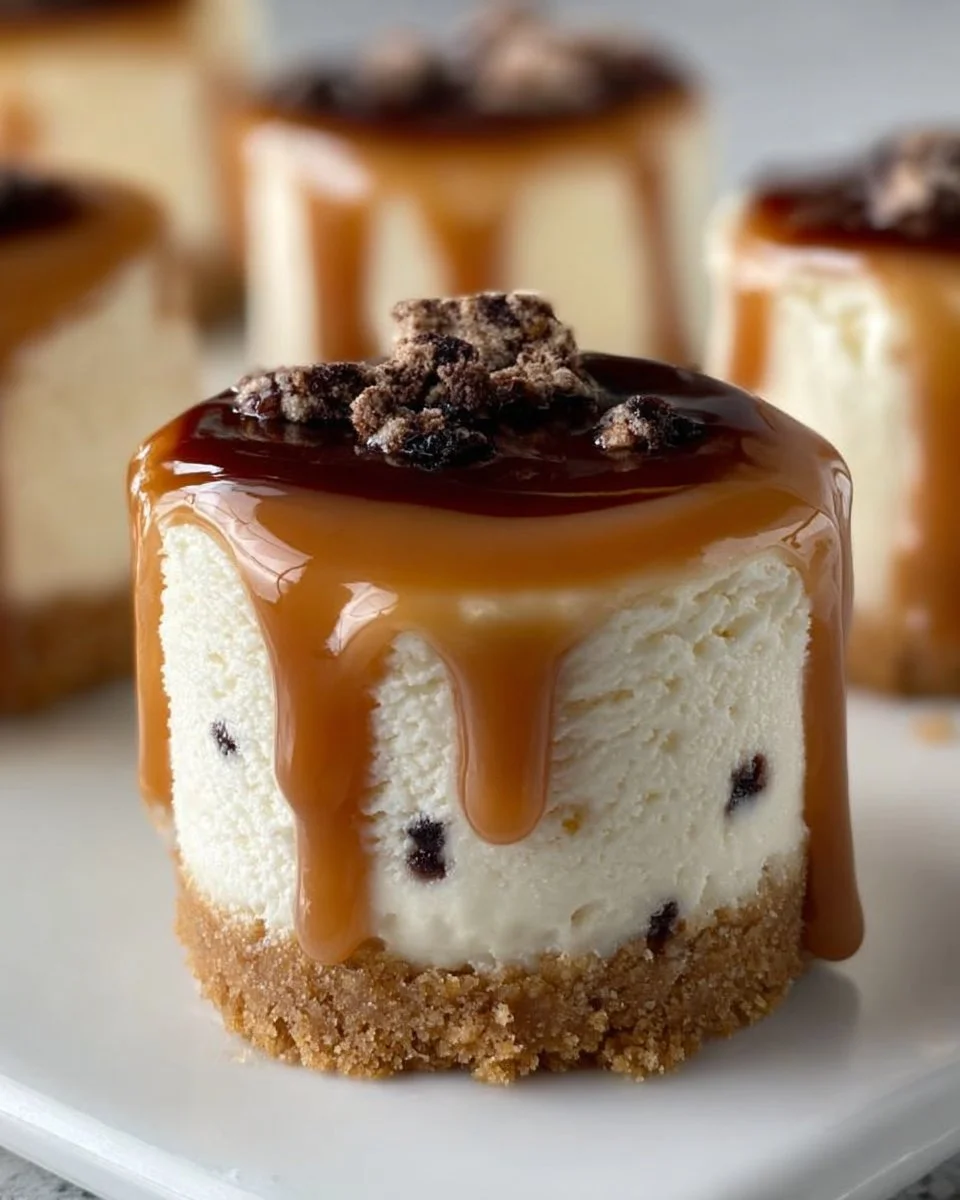
The moment you pop a mini cheesecake cup into your mouth, an explosion of flavors dances across your palate, enveloping you in creamy bliss. The rich, velvety texture of the cheesecake slides smoothly, melting effortlessly, while the sweet and buttery crunch of the graham cracker crust adds a delightful contrast. Each bite melds the caramel’s warm, decadent sweetness with the cool, luxurious filling, crafting an experience that feels both comforting and indulgent—a little morsel of heaven served in a cup. As you savor these treats, the aroma wafts through the air, hinting at the delightful combination of cream and vanilla that awaits you.
Perfect for any occasion, mini cheesecake cups embody the spirit of celebration. Whether you’re hosting a cozy dinner party or just treating yourself after a long week, these bite-sized delights promise to captivate hearts and taste buds alike. They offer a sweet escape, a reminder that sometimes the simple things can bring the deepest joy. With minimal effort and maximum impact, you can whip up these charming desserts that are sure to leave everyone requesting seconds—or thirds!
Why You’ll Love This Mini Cheesecake Cups
Indulgence meets elegance with these mini cheesecake cups. They are perfect for sharing yet rich enough to fulfill your personal cravings, making them a dual-purpose dessert that stands out on any dessert table. Their individual servings eliminate the fuss over slicing, allowing your guests to enjoy them at their leisure. Imagine a gathering of friends, each person cradling their little dessert cups, the excitement building as they prepare to dig in. The anticipation is almost as delicious as the cheesecake itself.
These cups burst with flavor and delight at every layer. The creamy filling paired with the sweet and crunchy graham cracker base creates an exquisite dessert with balance and harmony. You’ll discover that the beauty of this recipe lies not just in its taste but also in its versatility. The cups are perfect for any season, easily customizable to complement fresh berries in summer or warm spices in fall. With their inviting presence, they beckon you to indulge, ensuring that every bite is a celebration of joy.
Preparation Phase & Tools to Use
Creating these mini cheesecakes is not only straightforward; it’s a fun activity that guarantees an end result that looks as good as it tastes. You’ll need just a few essential tools to bring your delicious vision to life:
- Mixing Bowls: A couple of medium-sized bowls will streamline your preparation process, allowing you to mix easily without splatters.
- Electric Mixer: Whip the cream and blend the cream cheese effortlessly, achieving that silky texture that makes cheesecake truly divine.
- Spatula: This essential tool helps in folding ingredients together, ensuring those luscious flavors combine smoothly without losing airiness.
- Mini Dessert Cups or Glasses: Presenting your cheesecakes beautifully is part of the experience. Opt for clear cups to showcase the gorgeous layers within.
- Refrigerator: Chilling your creations is crucial to achieving that thick, satisfying consistency that we all love in a cheesecake.
Preparation tips: Make sure your cream cheese is softened adequately; this serves as the foundation for a smooth mixture. Let it sit at room temperature for about 30 minutes before starting. Pay special attention while whipping the cream; achieving stiff peaks will enhance the overall texture of your cheesecakes.
Ingredients for Mini Cheesecake Cups
- 8 oz cream cheese, softened: The star of the show, achieving a light and fluffy consistency when blended properly.
- 1/4 cup sugar: Sweetness enhances the overall flavor, balancing the tartness of the cream cheese.
- 1/2 tsp vanilla extract: A splash of vanilla adds depth, offering aromatic notes that elevate the cheesecake’s flavor.
- 1/2 cup heavy cream: Whipped to perfection, it incorporates air and richness, giving your cheesecake that magical creaminess.
- 1/2 cup vanilla bean ice cream or custard: This optional layer takes the dessert over the top, introducing unique flavors and luscious texture.
- 1/2 cup caramel sauce: A dreamy drizzle that binds the layers together, imparting a warm, buttery sweetness.
- 1 package of graham cracker crumbs: The perfect crunchy base, providing that essential graham cracker flavor with a satisfying crunch.
Feel free to substitute ingredients as needed! For instance, replace heavy cream with coconut cream for a dairy-free option or jazz up your crust with crushed Oreos or butter cookies for an exciting twist.
How to Make Mini Cheesecake Cups
-
Prepare the Cream Cheese Mixture: In a bowl, combine the softened cream cheese, sugar, and vanilla extract until everything blends smoothly. This will create the creamy base of your dessert.
-
Whip the Cream: In a separate bowl, vigorously whip the heavy cream until stiff peaks form. This step is crucial! The airiness of the whipped cream creates a light texture. Gently fold this whipped cream into the cream cheese mixture until well combined but airy.
-
Layer the Cups: Begin assembling! In your mini cups or dessert glasses, layer a spoonful of graham cracker crumbs at the bottom, forming a firm base that will crumble delightfully under your first bite.
-
Add Cheesecake Filling: Spoon a generous layer of the cream cheese mixture on top of the crumbs. Spread it evenly, creating a smooth and inviting layer of creamy delight.
-
Introduce the Vanilla Layer: If you’ve decided to use vanilla bean ice cream or custard, add a delightful layer of it now. This addition offers another texture and flavor dimension to your cheesecake.
-
Drizzle with Caramel: Finish this layer with a luscious drizzle of caramel sauce, allowing it to cascade down the sides of the cup, creating a visual treat.
-
Repeat the Layers: Continue with these layers until your cups are filled to the brim—there’s no such thing as too much cheesecake!
-
Chill: Cover and place your mini cheesecake cups in the refrigerator for at least 2 hours. Chilling allows the flavors to meld beautifully, and it solidifies the textures.
-
Serve Cold: Right before serving, top with extra caramel sauce, and if you’re feeling fancy, a sprinkle of crushed graham cracker for added flair.
Chef’s Notes & Helpful Tips
-
Make-Ahead: These mini cheesecake cups are perfect for meal prep! You can make them one day in advance. The flavors deepen overnight, enhancing the overall decadent experience.
-
Cooking Alternatives: Feel free to experiment with different baking methods. If you’re keen on adding a baked element, consider incorporating whipped egg whites for a lighter, soufflé-like cheesecake that’s baked in a mini ramekin.
-
Customization Ideas: Personalize your mini cheesecakes! Incorporate flavors like chocolate or pumpkin, adding cocoa powder or pumpkin puree to your cream cheese mixture. You can also swap caramel for chocolate or berry sauce for a fruity twist.
Common Mistakes to Avoid
-
Cream Cheese Not Softened: Always use softened cream cheese! Cold cream cheese creates lumps in your mixture and results in an uneven texture.
-
Overmixing the Cream: While you want everything combined, overmixing your whipped cream can lead to a grainy texture. Go gentle when folding!
-
Skipping the Chill: Don’t skip the refrigeration! This step is crucial for achieving the right thick and creamy texture. If you rush this process, the cups won’t hold their shape.
What to Serve With Mini Cheesecake Cups
These mini treats shine particularly well when paired with complementary flavors. Consider these delightful options:
- Fresh Berries: Juicy strawberries, raspberries, or blueberries offer a fresh and tart contrast that offsets the sweetness of the cheesecake.
- Coffee: A full-bodied cup of coffee balances the dessert’s richness, providing a lovely contrast of flavors.
- Whipped Cream: A dollop of freshly whipped cream adds extra creaminess and elevates the visual appeal.
- Chocolate Sauce: If caramel isn’t your jam, a drizzle of rich chocolate sauce creates a decadent pairing.
- Nuts: Chopped pecans or almonds sprinkled on top introduce an enticing crunch, enhancing texture.
- Mint Leaves: For a pop of freshness, a single mint leaf on top not only looks stunning but also invigorates the palate.
Storage & Reheating Instructions
Store any leftover mini cheesecake cups in the refrigerator, where they’ll stay fresh for up to three days. Ensure they’re tightly covered to prevent drying out or absorbing odors from other foods.
For freezing, wrap your cups tightly in plastic wrap, then place them in an airtight container. They keep well in the freezer for up to 3 months. To enjoy them, simply transfer to the refrigerator for a few hours to thaw before serving—no need for reheating!
Estimated Nutrition Information
Each mini cheesecake cup contains approximately 200 calories, 12g of fat, 25g of carbohydrates, and 2g of protein. This is a rough estimate and will depend on exact portion sizes and specific ingredients used.
Always check nutrition labels for precise information based on your chosen ingredients.
FAQs
How far in advance can I make mini cheesecake cups?
You can make them up to 24 hours in advance and chill them in the refrigerator. This resting time allows the flavors to meld beautifully.
Can I make these mini cheesecakes gluten-free?
Absolutely! Use gluten-free graham crackers or crushed nuts as the base, and make sure all your other ingredients are certified gluten-free.
What can I use instead of heavy cream?
Coconut cream works wonderfully as a dairy-free alternative and adds a subtle richness to your cheesecake cups.
How do I prevent my cheesecake from cracking?
Chilling is essential. Avoid overmixing, as this can introduce air. Keep an eye on temperature during preparation; ingredients should be at room temperature.
Can I use full-fat yogurt instead of cream cheese?
For a lighter version, you can substitute up to half of the cream cheese with full-fat yogurt, keeping in mind this will change the taste and texture slightly.
Conclusion
Mini cheesecake cups represent more than just a dessert; they encapsulate moments of joy, indulgence, and celebration. With each bite, you experience the delight of creamy textures, buttery crunch, and irresistible sweetness—a symphony of flavors that feels like a warm hug. As you prepare these delicious treats, let your creativity flow and share them with friends or indulge alone for a well-deserved treat. So, dive into the world of mini cheesecakes, and watch as these delightful creations transform any gathering into a sweet celebration!
Print
Mini Cheesecake Cups
- Prep Time: 20 minutes
- Cook Time: 120 minutes
- Total Time: 140 minutes
- Yield: 8 servings 1x
- Category: Dessert
- Method: Chilling
- Cuisine: American
- Diet: Vegetarian
Description
Delightful mini cheesecake cups with a creamy filling and crunchy graham cracker base, perfect for any celebration.
Ingredients
- 8 oz cream cheese, softened
- 1/4 cup sugar
- 1/2 tsp vanilla extract
- 1/2 cup heavy cream
- 1/2 cup vanilla bean ice cream or custard (optional)
- 1/2 cup caramel sauce
- 1 package of graham cracker crumbs
Instructions
- Prepare the Cream Cheese Mixture: In a bowl, combine the softened cream cheese, sugar, and vanilla extract until everything blends smoothly.
- Whip the Cream: In a separate bowl, vigorously whip the heavy cream until stiff peaks form. Gently fold this whipped cream into the cream cheese mixture until well combined.
- Layer the Cups: In your mini cups or dessert glasses, layer a spoonful of graham cracker crumbs at the bottom.
- Add Cheesecake Filling: Spoon a generous layer of the cream cheese mixture on top of the crumbs.
- Introduce the Vanilla Layer: Add a delightful layer of vanilla bean ice cream or custard, if using.
- Drizzle with Caramel: Finish this layer with a drizzle of caramel sauce.
- Repeat the Layers: Continue layering until the cups are filled.
- Chill: Cover and place in the refrigerator for at least 2 hours.
- Serve Cold: Top with extra caramel and crushed graham cracker before serving.
Notes
Make-ahead: These mini cheesecake cups can be prepared one day in advance for better flavor integration.
Nutrition
- Serving Size: 1 cup
- Calories: 200
- Sugar: 12g
- Sodium: 100mg
- Fat: 12g
- Saturated Fat: 7g
- Unsaturated Fat: 3g
- Trans Fat: 0g
- Carbohydrates: 25g
- Fiber: 1g
- Protein: 2g
- Cholesterol: 40mg