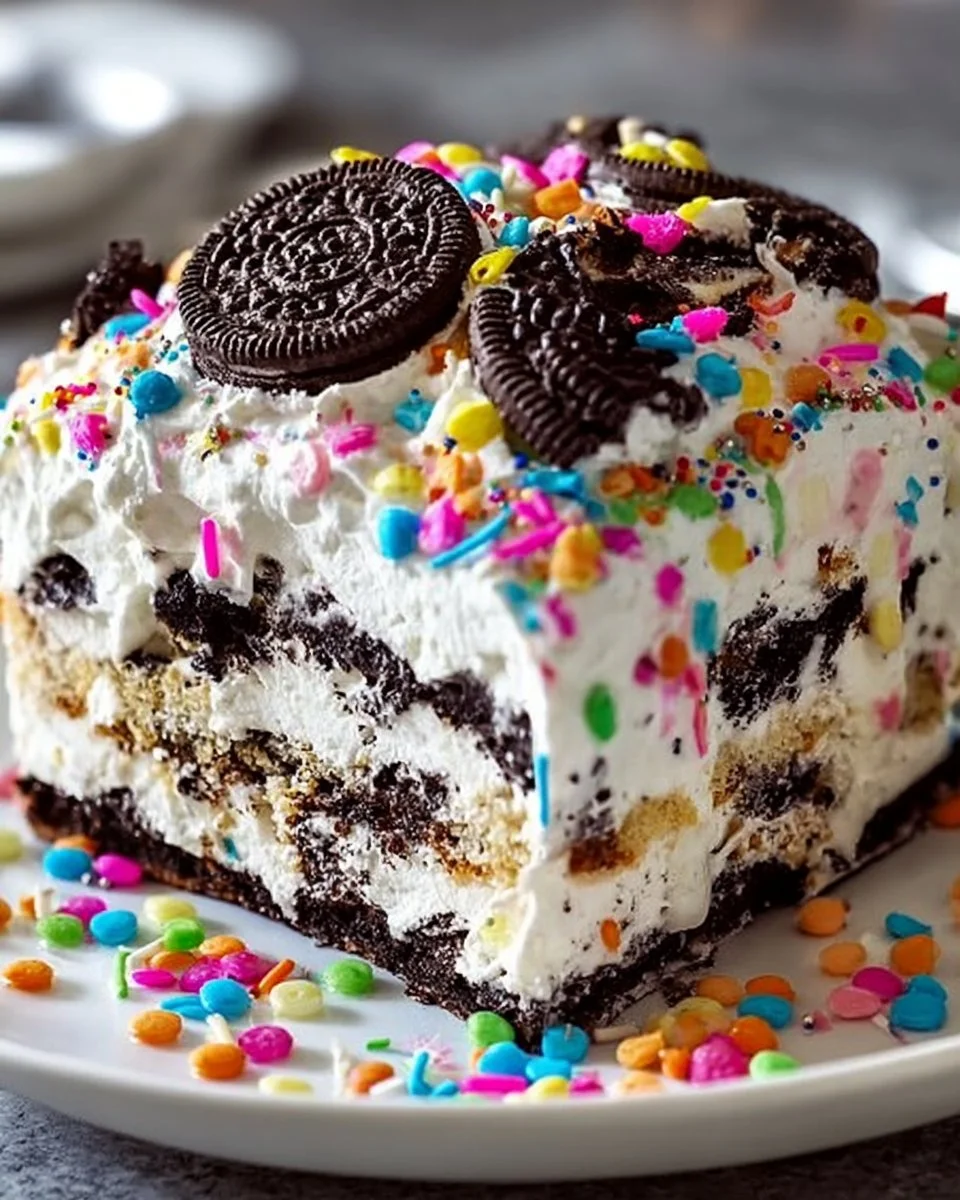
The first bite of this No Bake Funfetti Oreo Icebox Cake feels like a celebration: creamy clouds of sweetened cream cheese meet the unmistakable crunch and chocolate bite of Oreos, while tiny bursts of rainbow sprinkles streak every forkful with cheerful color. The cake practically melts on your tongue, softening the cookies into tender, fudgy layers that hold their shape but yield easily, creating a delightful contrast of textures. It smells like a bakery at a birthday party—sweet vanilla and chocolate wafting together—and it looks even more inviting than it tastes.
This dessert proves that fuss-free can still mean show-stopping. You don’t need an oven or complicated steps—just a whisk, a bowl, and a little patience while the cake sets. If you love Oreo desserts, you might also enjoy an alternative bite-sized treat like these easy Oreo cake balls, which echo the same cookie-and-cream magic in a different format. Trust me: once the layers chill and the flavors meld, people will ask for the recipe.
Why You’ll Love This No Bake Funfetti Oreo Icebox Cake
This cake dazzles because it balances familiarity and whimsy. It captures Oreo nostalgia—the crisp chocolate cookie and sweet cream—while adding the playful crunch and color of funfetti sprinkles. The cream mixture stays light and velvety, so the dessert never feels heavy, even after a generous slice.
- Perfect for celebrations: the sprinkles make it instantly festive for birthdays, baby showers, or any sunny afternoon picnic.
- No oven required: you save time and heat, and the cake stays simple enough for cooks of any skill level.
- Crowd-pleaser texture: crunchy-turned-soft cookie layers alternate with pillowy cream, giving every bite a satisfying contrast.
- Easy to scale: double or halve the recipe without changing the technique, and serve in a large dish or individual jars.
Preparation Phase & Tools to Use
The tools you choose affect how smooth and pretty your finished cake looks.
- Large mixing bowl: Use a roomy bowl to whip cream without splattering and to fold ingredients gently.
- Electric mixer (hand or stand): This saves effort and guarantees stiff whipped cream for structure. You can whip by hand, but expect a workout.
- Spatula: A flexible rubber spatula helps you fold without deflating the whipped cream and scrape every bit of mixture.
- Shallow serving dish or 9×9-inch pan: A flat dish helps cookies layer neatly; clear glass shows the pretty layers.
- Shallow bowl for milk: Use a wide, shallow bowl to dip cookies quickly and evenly.
- Plastic wrap or a lid: Covering the cake while chilling prevents it from absorbing fridge odors and keeps the top glossy.
Preparation tips:
- Chill the mixing bowl and beaters for 10–15 minutes before whipping the cream; cold tools help the cream reach stiff peaks faster.
- Soften the cream cheese to room temperature so it blends silky-smooth with powdered sugar; cold chunks will create a lumpy filling.
- Measure sprinkles by gently spooning them into the cup—do not pack—to keep the bright, light texture.
Ingredients for No Bake Funfetti Oreo Icebox Cake
- 24 Oreo cookies
- 1 cup heavy cream
- 8 oz cream cheese, softened
- 1/2 cup powdered sugar
- 1 tsp vanilla extract
- 1/2 cup funfetti sprinkles
- 1 cup milk (for dipping cookies)
Key ingredient notes and substitutions:
- Oreos: Original Oreos give the classic chocolate-cream contrast. For a slightly milder chocolate flavor, try Golden Oreos or sandwich cookies with chocolate filling. Gluten-free sandwich cookies work if you need a GF dessert.
- Heavy cream: Use full-fat heavy cream for stable whipped cream and a rich mouthfeel. Light cream won’t whip as stiffly.
- Cream cheese: Full-fat cream cheese yields the creamiest texture. Neufchâtel reduces fat but makes the filling tangier and softer.
- Powdered sugar: This dissolves smoothly into cream cheese and whipped cream; you can swap a portion for honey or maple if you want natural sweeteners, but the texture will change slightly.
- Vanilla extract: Don’t skip it; it elevates the sweetness and ties flavors together.
- Funfetti sprinkles: Use jimmies (rod-shaped) or nonpareils depending on texture preference. Metallic or large confetti flakes may bleed color—stick to standard baking sprinkles.
How to Make No Bake Funfetti Oreo Icebox Cake
-
Chill and whip the cream.
- Place the mixing bowl and beaters in the fridge for 10–15 minutes beforehand. Pour the heavy cream into the chilled bowl and whip on medium-high speed until stiff peaks form—when you lift the beaters the peaks should hold their shape sharply. Stiff whipped cream gives the cake body and prevents soggy layers.
-
Prepare the cream cheese filling.
- In a separate bowl, beat the softened cream cheese with powdered sugar and vanilla extract until completely smooth and lump-free. Scrape the bowl walls often to avoid hidden clumps.
-
Fold the whipped cream into the cream cheese.
- Add about one-third of the whipped cream to the cream cheese mixture and fold gently to lighten it. Fold in the remaining whipped cream with slow, sweeping motions—stop once streaks disappear. This preserves air and keeps the filling light.
-
Dip and layer the cookies.
- Pour the milk into a shallow bowl. Briefly dip each Oreo—about 1 second per side—so it wets but doesn’t collapse. Lay a single layer of dipped cookies in the bottom of your serving dish, fitting them snugly. Quick dips soften them enough to meld with the cream while retaining some structure.
-
Spread the cream and sprinkle.
- Spread a generous layer of the cream mixture over the cookie layer, smoothing with an offset spatula. Sprinkle a thin, even layer of funfetti sprinkles over the cream so every slice shows color.
-
Repeat layers.
- Continue alternating dipped cookie layers, cream, and sprinkles until you use all ingredients, finishing with a top layer of cream. Press lightly to even the top but avoid compacting the cake.
-
Chill to set.
- Cover the dish with plastic wrap and refrigerate for at least 4 hours, preferably overnight. Chilling lets the cookies soften to a tender, cake-like texture and allows flavors to meld fully.
-
Serve chilled.
- Remove from the fridge 10 minutes before serving so it slices cleaner. Use a sharp knife dipped in hot water and wiped dry between cuts for neat slices. Garnish with extra sprinkles for a festive finish.
Small tips within steps: if the cream seems too soft after folding, chill for 15–20 minutes to firm before layering. Dip cookies sparingly—too long and they’ll turn to paste.
Chef’s Notes & Helpful Tips
Make-ahead tips:
- Make the cake up to 48 hours in advance. The flavors meld and the texture becomes even better after overnight chilling.
- If you must prepare further ahead, wrap tightly and freeze for up to 1 month; thaw in the fridge overnight.
Cooking alternatives:
- Oven/air fryer: This dessert needs no heat; don’t try to bake it. If you want a warmed element, serve warm chocolate sauce on the side.
- Individual portions: Layer in jars or small glasses for portable, party-friendly servings. Reduce chill time to 2–3 hours for single-serve sizes.
Customization ideas:
- Swap sprinkles for crushed candy canes for a holiday twist.
- Fold 1/2 cup chopped strawberries or raspberries into the cream for a fruity contrast.
- Add a thin layer of melted chocolate between layers for a fudgier experience.
- Make it boozy: brush the cookies with 1–2 tablespoons of coffee liqueur or rum for an adult version.
Common Mistakes to Avoid
- Over-dipping cookies: Letting cookies soak longer than a second or two will make the layers mushy and collapse. Dip quickly.
- Over-mixing whipped cream: Stirring too vigorously when folding will deflate the cream. Use gentle folding motions and stop as soon as the mixture looks uniform.
- Using cold cream cheese: Cold cream cheese doesn’t blend smoothly and leaves lumps. Always soften to room temperature.
- Skipping the chill time: Cutting too soon makes the filling unstable and messy. Patrol patience—chill at least 4 hours.
- Adding sprinkles to the top too early: Sprinkles can bleed color if they sit on wet cream too long. Add final decorations just before serving, or use a light sprinkle during layering and a fresh garnish at the end.
What to Serve With No Bake Funfetti Oreo Icebox Cake
- Fresh berries (strawberries, raspberries, blueberries): Bright, slightly tart berries cut through the cream’s sweetness.
- Espresso or strong coffee: The coffee’s bitterness balances the dessert and enhances chocolate notes.
- Vanilla ice cream: For doubly creamy indulgence, a small scoop adds a cold, silky contrast.
- Milkshakes or cold brew floats: Keep the vibe playful—serving the cake with a creamy drink doubles down on nostalgia.
- Sparkling wine or champagnes: Bubbles and acidity refresh the palate after rich, creamy bites during celebrations.
- Lemon sorbet: A sharp, icy scoop cleanses the palate and adds a zesty counterpoint.
- Chocolate-covered pretzels: Offer a crunchy-salty contrast on a dessert board for textural variety.
- Whipped cream and extra sprinkles: Keep a piping bag on hand for last-minute decoration and to make each slice photo-ready.
Storage & Reheating Instructions
Refrigerator:
- Store the cake covered in plastic wrap or in an airtight container for up to 4–5 days. Keep it chilled to preserve texture and prevent the cream cheese from loosening.
Freezer:
- Wrap the cake tightly in plastic wrap and then foil, or freeze in an airtight container, for up to 1 month. Thaw in the refrigerator overnight before serving.
Reheating:
- This dessert tastes best chilled; don’t microwave. If you want a warmed contrast, heat a small amount of chocolate sauce and drizzle it over chilled slices just before serving. For individual portions previously frozen, thaw in the fridge and allow 10–15 minutes at room temperature for the cream to soften slightly before serving.
Estimated Nutrition Information
Approximate per-serving values (assuming 8 servings):
- Calories: 420 kcal
- Fat: 25 g
- Saturated Fat: 14 g
- Carbohydrates: 45 g
- Sugar: 30 g
- Protein: 6 g
- Fiber: 1 g
Nutrition varies by brand of Oreos, type of cream cheese, and portion size. These values serve as rough estimates only.
FAQs
Q: Can I use whipped topping instead of heavy cream?
A: You can swap in stabilized whipped topping (like Cool Whip) if you prefer convenience, but the texture becomes slightly less fresh and airy. If you use whipped topping, fold it gently into the cream cheese and avoid over-chilling to prevent sugar crystallization.
Q: My cream separated when I folded. What did I do wrong?
A: That happens if you over-fold or stir too vigorously. Use a light hand—fold with a rubber spatula in wide, slow strokes, turning the bowl as you fold. If separation occurs, refrigerate the mixture for 20–30 minutes and gently fold to recombine.
Q: How long will the Oreos stay slightly crunchy?
A: After 4 hours, the dipped Oreos soften into a tender, cake-like layer. They won’t remain crunchy; that’s the intended texture contrast between initial crispness and softened layers. If you prefer more crunch, reduce the dip time, but don’t skip dipping altogether or the layers won’t bind.
Q: Can I make this gluten-free or dairy-free?
A: Yes. Use gluten-free sandwich cookies and a dairy-free cream cheese plus a coconut cream that whips into stiff peaks. The texture shifts slightly—coconut cream tends to be softer—but you still get a delicious no-bake dessert.
Q: Why did my cake weep or become watery on top?
A: Weeping usually comes from over-whipped cream that starts releasing moisture or from temperature fluctuations. Make sure to whip cream to stiff peaks (not overwhipped) and keep the cake chilled in a stable refrigerator temperature. Pressing layers too hard can also force out moisture—be gentle.
Q: Can I add layers of fresh fruit between the cookies?
A: Absolutely. Thin slices of strawberries or banana work beautifully. Use fruits that don’t brown quickly, and pat them dry so you don’t add excess moisture to the layers.
Conclusion
This No Bake Funfetti Oreo Icebox Cake brings instant joy with minimal effort—perfect for last-minute parties or when you simply want to treat yourself. The whipped cream and cream cheese blend into a light, dreamy filling; the Oreos transform into tender chocolate layers; and the sprinkles add that celebratory wink on every plate. If you’d like another take on Oreo-based no-bake desserts, check out this classic No-Bake Funfetti Oreo Icebox Cake | The Domestic Rebel for inspiration and variations.
Print
No Bake Funfetti Oreo Icebox Cake
- Prep Time: 15 minutes
- Cook Time: 0 minutes
- Total Time: 240 minutes
- Yield: 8 servings 1x
- Category: Dessert
- Method: No-Bake
- Cuisine: American
- Diet: Vegetarian
Description
A creamy and colorful no-bake cake featuring layers of Oreos, sweetened cream cheese, and funfetti sprinkles.
Ingredients
- 24 Oreo cookies
- 1 cup heavy cream
- 8 oz cream cheese, softened
- 1/2 cup powdered sugar
- 1 tsp vanilla extract
- 1/2 cup funfetti sprinkles
- 1 cup milk (for dipping cookies)
Instructions
- Chill the mixing bowl and beaters for 10–15 minutes. Pour the heavy cream into the chilled bowl and whip until stiff peaks form.
- Prepare the cream cheese filling by beating softened cream cheese with powdered sugar and vanilla extract until smooth.
- Fold one-third of the whipped cream into the cream cheese mixture and then fold in the remaining whipped cream gently.
- Dip each Oreo in milk for about 1 second per side and lay them in the bottom of your serving dish.
- Spread a layer of cream mixture over the cookies and sprinkle with funfetti.
- Repeat the layering process until all ingredients are used, finishing with a layer of cream.
- Chill the dish in the refrigerator for at least 4 hours or overnight to set.
- Serve chilled and enjoy!
Notes
This cake can be made 48 hours in advance. For variation, swap out the funfetti sprinkles or mix in fresh fruit.
Nutrition
- Serving Size: 1 serving
- Calories: 420
- Sugar: 30g
- Sodium: 250mg
- Fat: 25g
- Saturated Fat: 14g
- Unsaturated Fat: 6g
- Trans Fat: 0g
- Carbohydrates: 45g
- Fiber: 1g
- Protein: 6g
- Cholesterol: 30mg