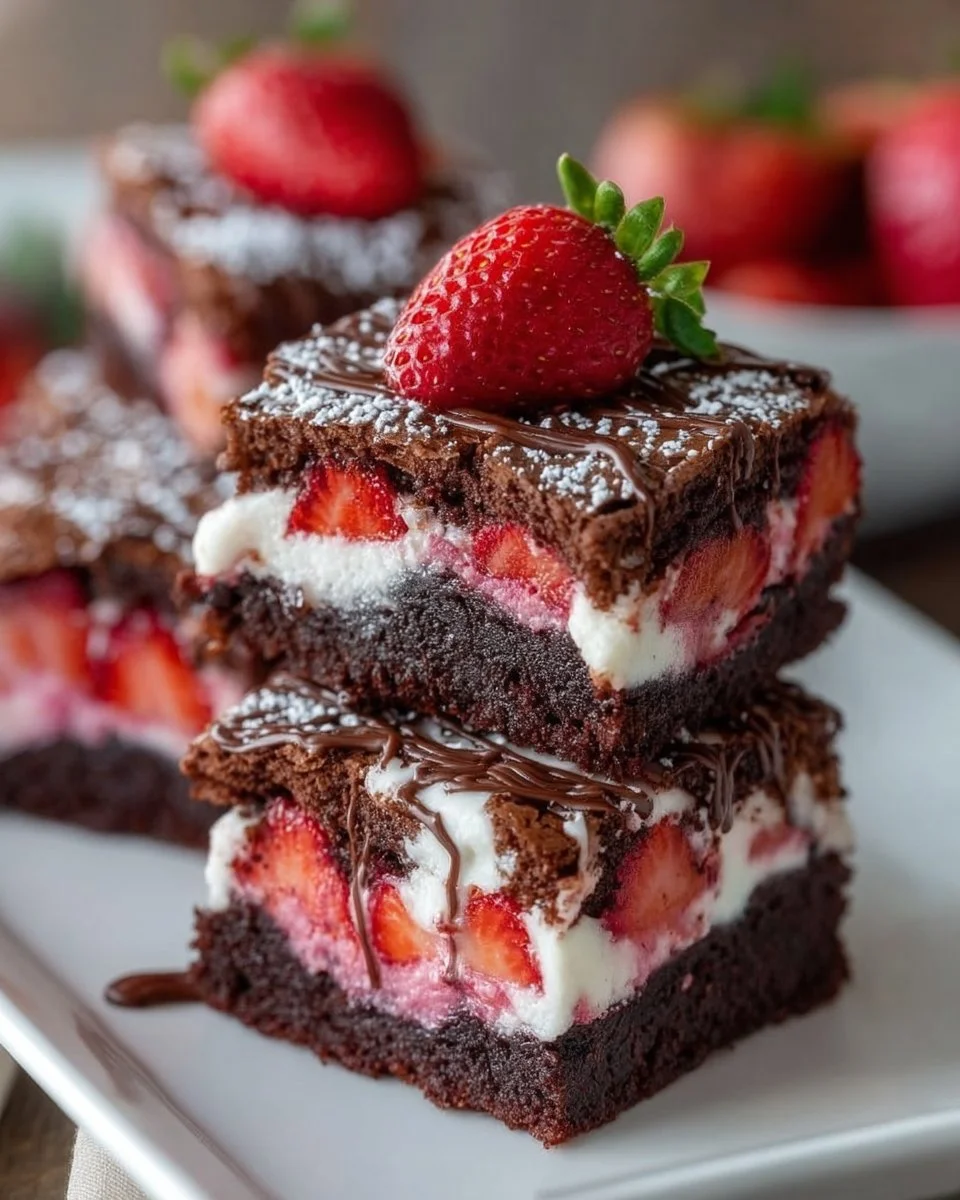
When you take a slice of Strawberry Earthquake Cake, you experience an explosion of flavors and textures that tantalizes every taste bud. Picture this: a soft, fluffy cake infused with the vibrant sweetness of ripe strawberries, each bite unveiling the creamy surprise of a rich cream cheese filling. The contrasting textures perfectly blend sweetness with a hint of tanginess, while the chocolate chips bring a comforting warmth and decadence—a real treat for the senses that warms the heart and lifts the spirit. The inviting aroma wafts through your kitchen, luring family and friends to gather around, hearts full of anticipation.
This cake is more than just a delightful dessert; it’s a celebration of summer’s bountiful strawberries and the joy that comes from baking with love. The beauty of the Strawberry Earthquake Cake lies not only in its taste but also in its homemade charm and the special moments it creates. Whether you’re preparing for a festive gathering, a cozy family dinner, or simply indulging in a sweet moment for yourself, this cake provides the perfect backdrop. In a world where life moves fast, this recipe encourages you to savor each slice, relish every crumb, and share joyful experiences with those you hold dear.
Why You’ll Love This Strawberry Earthquake Cake
This Strawberry Earthquake Cake is the epitome of why dessert should be a celebration. First and foremost, the taste: it envelops your palate with lush strawberry sweetness, subtle creaminess from the cheese, and satisfying chocolatey richness from the chips. Each layer teases your senses differently, creating a delightful experience bite after bite.
This cake shines in any setting, whether it graces a birthday party, a summer picnic, or a simple Wednesday dessert. The vibrant colors and enticing layers make it not only a pleasure to eat but also a feast for the eyes, sure to impress your guests. You stand out as the host who knows that dessert should be as delightful to behold as it is to consume.
Moreover, it’s a versatile recipe. Easy enough for novice bakers to tackle, yet impressive enough for seasoned home chefs, the Strawberry Earthquake Cake adapts well to various occasions and can even accommodate dietary preferences with simple substitutions. Prepare to become everyone’s favorite dessert maker!
Preparation Phase & Tools to Use
Before diving into the delicious details, let’s gather some essential tools that will help make the baking process smooth and enjoyable. Having the right tools ensures consistency and ease as you create this delightful cake.
-
Mixing Bowls: Choose a large mixing bowl for combining your wet and dry ingredients. A medium bowl is ideal for mixing the cream cheese filling.
-
Electric Mixer: This tool makes it easy to blend your cake batter and cream cheese filling to a silky, lump-free consistency. Hand mixer or stand mixer, either works brilliantly!
-
Measuring Cups and Spoons: Precision is key in baking; having dedicated measuring tools makes sure your ratios are just right.
-
Spatula: A rubber spatula helps fold in ingredients gently while reducing the risk of over-mixing.
-
9×13 Baking Pan: This size is perfect for our Strawberry Earthquake Cake, allowing it to bake evenly and make serving a breeze.
-
Toothpick: A must-have tool for checking if your cake is perfectly baked.
For preparation, ensure your ingredients are at room temperature, especially the cream cheese. It blends much easier when soft, resulting in a smoother filling. Don’t forget to preheat your oven first; a well-warmed oven helps your cake rise beautifully!
Ingredients for Strawberry Earthquake Cake
To make your very own Strawberry Earthquake Cake, gather the following ingredients:
- 1 box of strawberry cake mix (or homemade strawberry cake)
- 1 cup of water
- 1/3 cup of vegetable oil
- 3 large eggs
- 1 cup of fresh strawberries, chopped
- 8 oz cream cheese, softened
- 1 cup powdered sugar
- 1/2 cup chocolate chips (dark or semi-sweet)
- 1 tsp vanilla extract
- 1/4 cup of milk (for cream cheese mixture)
Substitution Suggestions
- Cake Mix: For a healthier option, consider using a whole-grain cake mix or a gluten-free alternative.
- Fresh Strawberries: If strawberries are out of season, substitute with frozen strawberries (thawed and drained) or other berries like raspberries or blueberries.
- Cream Cheese: Greek yogurt can be used for a lighter filling instead of cream cheese.
- Chocolate Chips: Swap chocolate chips for white chocolate or butterscotch chips for a different flavor profile.
Each of these key ingredients contributes to the success of this dish, making it truly special while allowing for subtle adaptations that suit your tastes!
How to Make Strawberry Earthquake Cake
Step 1: Preheat the Oven
Preheat your oven to 350°F (175°C) and grease a 9×13 inch baking pan. Knowing your cake won’t stick gives you peace of mind, ensuring a beautiful release once it’s fully baked.
Step 2: Prepare the Cake Batter
In a large mixing bowl, combine the strawberry cake mix, water, oil, and eggs. Mix on medium speed for about 2 minutes until well blended, achieving that smooth, lump-free batter that promises delight upon baking.
Step 3: Add Strawberries
Gently fold in the chopped strawberries into the batter. This step infuses the cake with bursts of fresh flavor, adding moisture that keeps each slice heavenly.
Step 4: Bake the Cake
Pour the batter into the prepared baking pan, smoothing the top with a spatula. Bake in your preheated oven for about 30 minutes or until a toothpick inserted in the center comes out clean, a sign of your cake’s readiness.
Step 5: Prepare the Cream Cheese Mixture
While the cake bakes, prepare the cream cheese filling. In a medium bowl, beat together the softened cream cheese, powdered sugar, vanilla extract, and milk until smooth and creamy. This dreamy mixture will create a rich layer within your cake.
Step 6: Swirl the Filling
Once the cake is done baking, remove it from the oven and let it cool for about 10 minutes. With a knife or skewer, create gentle swirls in the cake by pushing the cream cheese mixture into it, teasing out its lusciousness. Sprinkle the chocolate chips atop for extra decadence.
Step 7: Final Bake
Return the cake to the oven for an additional 10-15 minutes. The cream cheese filling should firm up slightly, while the chocolate chips melt into your creation, adding to that eye-catching wonder.
Step 8: Cool and Serve
Allow your cake to cool completely in the pan before slicing. This crucial step helps meld those delightful flavors, making it easier to serve and enjoy.
Chef’s Notes & Helpful Tips
-
Make-Ahead Tips: You can prepare the cake a day in advance and let it sit overnight. This will deepen the flavors while keeping it moist.
-
Cooking Alternatives: If you want to try an air fryer, adjust the temperature to about 320°F (160°C) and check for doneness after around 25 minutes.
-
Customization Ideas: Fold in nuts for an added crunch, or drizzle a simple icing on top for extra sweetness. Sprinkle fresh mint leaves for a pop of color and refreshing flavor when serving!
Common Mistakes to Avoid
Baking may seem easy, but it can surprise even the most seasoned bakers. Here are a few common pitfalls and how to avoid them:
-
Overmixing the Batter: Mixing too vigorously can lead to a dense cake. Gently mix until the ingredients are just combined.
-
Not Preheating the Oven: This can lead to uneven baking. Always preheating is crucial for the right texture.
-
Ignoring Cooling Time: Cutting into the cake too early can make it crumble. Patience pays off—let it cool thoroughly for the best results!
What to Serve With Strawberry Earthquake Cake
Pair your Strawberry Earthquake Cake with delightful accompaniments to enhance the experience:
-
Whipped Cream: A dollop of freshly whipped cream boosts the rich flavors of the cake effectively.
-
Vanilla Ice Cream: The creamy, cool element of ice cream balances the cake’s sweetness beautifully.
-
Fresh Berries: Strive for a refreshing contrast of flavors with additional strawberries or mixed berries atop your slice.
-
Mint Leaves: Crisp mint clears the palate, adding a fresh taste that pairs wonderfully with rich dessert.
-
Coffee or Tea: A warm beverage rounds out the meal, enhancing those sweet flavors perfectly.
-
Chocolate Sauce: Drizzle a bit for an extra sweet indulgence that tempts the taste buds.
Storage & Reheating Instructions
To store your Strawberry Earthquake Cake, cover it tightly with plastic wrap or aluminum foil to keep it moist. You can keep it at room temperature for up to two days or refrigerate it for up to a week. If you’d like to store it longer, slice it and keep it in an airtight container in the freezer for up to three months.
When you’re ready to enjoy, simply let the slices sit at room temperature or microwave them briefly for a few seconds, bringing back that welcoming warmth and oozing flavors.
Estimated Nutrition Information
While enjoying the decadence of Strawberry Earthquake Cake, keep in mind the following estimated nutritional information per slice (based on 12 servings):
- Calories: 320
- Total Fat: 15g
- Saturated Fat: 5g
- Carbohydrates: 45g
- Sugars: 28g
- Protein: 3g
(Disclaimer: This is a rough estimate and will vary based on specific ingredients used.)
FAQs
1. Can I use frozen strawberries for this recipe?
Absolutely! Thaw and drain them before adding to the batter for the best results. Freshness may vary, but they will still add that lovely strawberry flavor.
2. Is there a way to make this cake healthier?
Yes! Try using whole grain or gluten-free cake mix. Consider swapping Greek yogurt for the cream cheese for a lighter filling without sacrificing flavor.
3. Can I make this cake ahead of time?
Yes! You can prepare it a day in advance. Store it in the refrigerator; it will improve the flavors and texture!
4. Can I add other flavors to the cake?
Certainly! You might add a dash of almond extract for a nutty flavor or mix in different types of chocolate chips or nut butters for different spin on the taste.
5. What is the best way to store leftovers?
Cover the cake tightly and store it at room temperature for up to two days. For longer storage, wrap individual slices and freeze them for later enjoyment.
Conclusion
As you embark on the journey of crafting your own Strawberry Earthquake Cake, embrace the joy of creating something truly special. Allow the laughter and smiles of loved ones to fill your kitchen while the enchanting aroma floats through the air. The combination of strawberries, creaminess, and chocolate indulgence guarantees that this cake will become a favorite in your home. So gather those ingredients, follow the steps, and prepare to delight in the wonderful experience of baking this captivating dessert. Your taste buds will thank you!
Print
Strawberry Earthquake Cake
- Prep Time: 15 minutes
- Cook Time: 40 minutes
- Total Time: 55 minutes
- Yield: 12 servings 1x
- Category: Dessert
- Method: Baking
- Cuisine: American
- Diet: Vegetarian
Description
A delightful dessert with layers of vibrant strawberry flavor, creamy cream cheese filling, and decadent chocolate chips.
Ingredients
- 1 box of strawberry cake mix (or homemade strawberry cake)
- 1 cup of water
- 1/3 cup of vegetable oil
- 3 large eggs
- 1 cup of fresh strawberries, chopped
- 8 oz cream cheese, softened
- 1 cup powdered sugar
- 1/2 cup chocolate chips (dark or semi-sweet)
- 1 tsp vanilla extract
- 1/4 cup of milk (for cream cheese mixture)
Instructions
- Preheat your oven to 350°F (175°C) and grease a 9×13 inch baking pan.
- Combine the strawberry cake mix, water, oil, and eggs in a large mixing bowl; mix on medium speed for about 2 minutes.
- Fold in the chopped strawberries gently into the batter.
- Pour the batter into the prepared baking pan and smooth the top with a spatula.
- Bake for about 30 minutes or until a toothpick inserted in the center comes out clean.
- Prepare the cream cheese filling by beating together the softened cream cheese, powdered sugar, vanilla extract, and milk until smooth.
- Create gentle swirls in the baked cake with a knife and sprinkle chocolate chips on top.
- Return the cake to the oven for an additional 10-15 minutes.
- Cool completely in the pan before slicing.
Notes
For best results, let the cake sit overnight for flavors to deepen. You can also use frozen strawberries if fresh ones aren’t available.
Nutrition
- Serving Size: 1 slice
- Calories: 320
- Sugar: 28g
- Sodium: 200mg
- Fat: 15g
- Saturated Fat: 5g
- Unsaturated Fat: 8g
- Trans Fat: 0g
- Carbohydrates: 45g
- Fiber: 2g
- Protein: 3g
- Cholesterol: 30mg