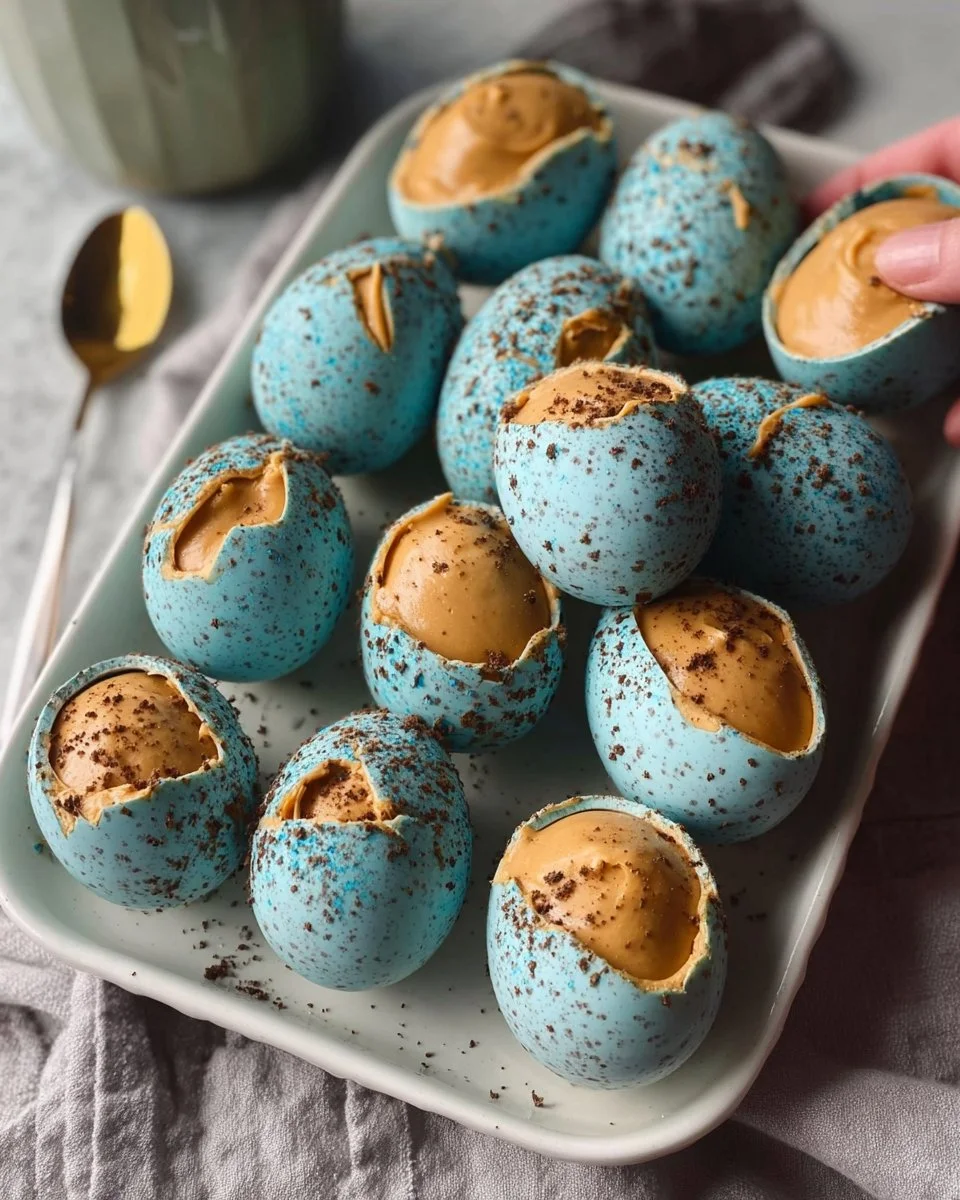
Indulge in the delightful magic of Peanut Butter Easter Eggs, where the childhood nostalgia meets adult sophistication. Picture yourself biting into a lovingly handmade treat, a creamy concoction of velvety peanut butter that envelopes your senses. Each egg melts in your mouth, releasing a rich, nutty flavor punctuated by a hint of sweetness from the maple syrup. The delicate crunch of the white chocolate shell contrasts beautifully with the soft and dreamy peanut butter center, creating a divine interplay of textures that leaves you yearning for more. As they chill in the fridge, the heavenly aroma of chocolate wafts through your kitchen, igniting the spirit of Easter and inviting everyone to share in this delicious sweetness.
These treats not only look beautiful, adorned with a speckled finish that mimics real eggs, but they also promise to become a cherished family tradition. They balance the fun of DIY candy-making with the wholesome goodness of natural ingredients. You can feel good about serving these delightful bites because they omit artificial flavors and lean on wholesome alternatives like almond flour and maple syrup. Whether enjoyed at a festive gathering or as a secret late-night snack, Peanut Butter Easter Eggs easily steal the show and warm even the coldest of hearts.
Why You’ll Love This Peanut Butter Easter Eggs Recipe
This recipe is a match made in culinary heaven, especially for those who adore the creamy richness of peanut butter. The perfect blend of flavors creates a wonderfully satisfying sweet treat that speaks to the soul without the guilt of conventional candy. The natural ingredients lend themselves to a flavor profile that is both authentic and comforting, allowing you to savor your indulgence without compromise.
You’ll love how versatile these Easter eggs are; they fit seamlessly into various occasions. From Easter celebrations to birthday parties and even casual family movie nights, they can make any gathering a little sweeter and a lot more fun. Plus, you can personalize their appearance with colors and decorations, making them feel festive for any time of year. They stand out not just for their taste but for their unique homemade touch, making any event feel special.
Preparation Phase & Tools to Use
To get started on this delicious journey, gather the essential tools that will help you create these little wonders:
-
Mixing Bowl: A sturdy bowl is crucial for combining your peanut butter filling. A large bowl ensures you have ample room to mix everything thoroughly without making a mess.
-
Baking Sheet: A flat baking sheet lined with parchment paper provides the perfect surface to set your eggs before freezing. The parchment makes egg removal easy, preventing any sticking.
-
Microwave-Safe Bowl: When melting the white chocolate, a microwave-safe bowl is vital; it allows easy melting in intervals, ensuring the chocolate remains smooth without burning.
-
Toothpicks: These handy little tools are your best friend for dipping the eggs into chocolate. They help you coat each egg evenly while handling them gracefully.
-
Pastry Brush: This brush will add the finishing touch by creating the charming speckled effect on your eggs.
-
Measuring Cups and Spoons: Accurate measurements play a key role in ensuring your flavors balance perfectly, so don’t overlook this step in your preparation.
Preparation tips: Take a moment to set aside all your ingredients, and prepare a clean workspace. It enhances not only your efficiency but also makes the experience more enjoyable.
Ingredients for Peanut Butter Easter Eggs
- 1 1/4 cup natural, runny peanut butter (no sugar added): This forms the luscious base of your filling, providing that smooth, rich texture we all love.
- 1/4 cup maple syrup: An excellent natural sweetener that adds depth and a hint of caramel undertones.
- 1/4 cup powdered sugar: This sweetens the filling without making it gritty.
- 1/3 cup almond flour: Contributes to the creaminess while keeping the mixture gluten-free.
- 1/2 teaspoon vanilla extract: A splash of vanilla enhances the overall flavor and rounds out the sweetness.
- Pinch of salt: Just a hint amplifies the sweet and nutty profile.
- 8 ounces white chocolate melting wafers (Ghirardelli recommended): These provide a smooth, creamy coating on the eggs.
- 2 teaspoons coconut oil: This helps the chocolate melt smoothly and gives it a beautiful shine when cooled.
- 1/2 teaspoon blue spirulina + 1/4 teaspoon matcha powder: These provide natural coloring; however, food dyes can be substituted as needed.
Speckle Mixture:
- 1 teaspoon cocoa powder + 1 tablespoon water: Creates a charming rustic appearance for your Easter eggs.
Feel free to swap white chocolate for dark or milk chocolate based on your preference, and experiment with different nut butters if you’re feeling adventurous!
How to Make Peanut Butter Easter Eggs
-
Mix the Filling: In a mixing bowl, combine the creamy peanut butter, maple syrup, powdered sugar, almond flour, vanilla extract, and a pinch of salt. Beat everything together until the mixture is smooth and well-blended. The lush mixture should feel inviting and taste just right—even raw, it’s heavenly!
-
Shape the Eggs: Scoop approximately 2 tablespoons of the filling and roll it into a ball using your hands. Carefully shape the ball into an egg-like oval, ensuring it holds its form. This step is where your creativity shines! Place all the shaped eggs on a baking sheet lined with parchment paper.
-
Freeze the Filling: Move the baking sheet to the freezer and let the eggs chill for at least 15-20 minutes. This step firms them up, making the coating process easier.
-
Prepare the Chocolate Coating: In a microwave-safe bowl, combine the white chocolate melting wafers and coconut oil. Microwave in 15-20 second intervals, stirring well in between until everything is perfectly smooth. Add the spirulina and matcha, adjusting until you achieve just the right hue.
-
Coat the Eggs: Once the eggs are semi-frozen, now is the time for chocolate magic! Take a toothpick and insert one end into the bottom of an egg. Dip it into the melted chocolate, letting the excess drip off. Allow the coating to set for a moment, then return to the parchment paper and carefully remove the toothpick. Timing is critical—remove the toothpick while the chocolate is still soft to avoid cracks.
-
Add the Speckles: To create the speckled effect, dip a pastry brush into your cocoa powder and water mixture. Hold it over the baking sheet and flick the bristles to create charming spots on your eggs. Do remember, this can get quite messy, so wearing an apron is highly recommended!
-
Chill Once More: Refrigerate your finished eggs until the chocolate shell hardens—approximately 10 minutes.
Chef’s Notes & Helpful Tips
-
Make-Ahead Tips: You can prepare the filling and shape the eggs a day ahead. Just freeze them, then coat them just before serving.
-
Cooking Alternatives: Don’t have a microwave? Use a double boiler to melt the chocolate instead. This gives you more control over the chocolate and prevents it from burning.
-
Customization Ideas: Try different flavor profiles by adding ingredients like crushed pretzels for crunch, or experiment with flavored extracts like almond or hazelnut for a twist.
Common Mistakes to Avoid
Creating Peanut Butter Easter Eggs can be simple, but certain pitfalls can lead to frustration—here’s how to avoid them:
-
Not Freezing Long Enough: If your filling is too soft, the eggs may lose their shape during coating. Ensure they are adequately frozen before dipping.
-
Overheating the Chocolate: Chocolate can seize up if overheated. Always melt in short intervals and stir well.
-
Not Removing the Toothpick Soon Enough: If you leave the toothpick in too long, it may be incredibly hard to remove later without cracking the chocolate shell.
What to Serve With Peanut Butter Easter Eggs
Pair your deliciously homemade Peanut Butter Easter Eggs with delightful accompaniments for a well-rounded experience:
- Coffee: The rich flavor of coffee complements the sweetness of the eggs, making for a heavenly afternoon treat.
- Milk: A classic pairing, the cold milk enhances the creaminess of the peanut butter and chocolate.
- Fruit Salad: A mix of fresh, vibrant fruits brings a refreshing contrast and balances the rich flavor of the eggs.
- Ice Cream: Serve these eggs with a scoop of vanilla or coffee ice cream for an extravagant dessert experience.
- Chai Tea: The warm spices in chai create comfort that pairs perfectly with the richness of the filling.
- Nut Mix: A small bowl of mixed nuts adds crunch and healthiness to your dessert table, balancing the sweetness.
Storage & Reheating Instructions
Store your Peanut Butter Easter Eggs in an airtight container. They keep well in the refrigerator for about a week, allowing the flavors to meld beautifully. If you want to preserve them for longer, pop them into the freezer. They can last up to three months. When you’re ready to enjoy them, thaw them in the fridge overnight for the best texture.
Estimated Nutrition Information
Each egg contains approximately:
- Calories: 180
- Total Fat: 12g
- Saturated Fat: 4g
- Carbohydrates: 14g
- Sugars: 10g
- Protein: 3g
This is merely an estimate and will vary based on specific measurements and brands used.
Frequently Asked Questions
1. Can I use other nut butters instead of peanut butter?
Absolutely! Almond butter or cashew butter works wonderfully in this recipe, providing a different flavor profile while maintaining creaminess.
2. What type of chocolate can I use?
You can use dark or milk chocolate if you prefer a different flavor. Just ensure that you adjust the sweetness accordingly.
3. How can I add textures to my Peanut Butter Easter Eggs?
For crunch, feel free to mix in chopped nuts or toffee bits into your peanut butter filling before shaping them into eggs.
4. Is the blue spirulina necessary?
Not at all! It’s purely for coloring aesthetics. Feel free to skip it, or substitute it with any food coloring that you wish to use.
5. Can I make these gluten-free?
Yes! This recipe is already gluten-free as it uses almond flour. Just ensure that all other ingredients are certified gluten-free.
Conclusion
With their creamy, nutty center, crisp white chocolate coating, and delightful speckled finish, Peanut Butter Easter Eggs offer a deliciously nostalgic treat that’s perfect for any occasion. Making these eggs at home allows you to create a sweet experience that’s full of love, flavor, and a bit of whimsy. So roll up your sleeves, gather your loved ones, and embark on this delicious adventure. Your taste buds will thank you, and so will everyone lucky enough to share in your delightful creation!
Print
Peanut Butter Easter Eggs
- Prep Time: 20 minutes
- Cook Time: 10 minutes
- Total Time: 30 minutes
- Yield: 12 servings 1x
- Category: Dessert
- Method: Chilling
- Cuisine: American
- Diet: Vegetarian
Description
Indulge in the delightful magic of Peanut Butter Easter Eggs, a creamy treat with a rich, nutty flavor, perfect for any occasion.
Ingredients
- 1 1/4 cup natural, runny peanut butter (no sugar added)
- 1/4 cup maple syrup
- 1/4 cup powdered sugar
- 1/3 cup almond flour
- 1/2 teaspoon vanilla extract
- Pinch of salt
- 8 ounces white chocolate melting wafers
- 2 teaspoons coconut oil
- 1/2 teaspoon blue spirulina
- 1/4 teaspoon matcha powder
- 1 teaspoon cocoa powder + 1 tablespoon water (for speckling)
Instructions
- Mix the Filling: In a mixing bowl, combine the peanut butter, maple syrup, powdered sugar, almond flour, vanilla extract, and salt. Beat until smooth.
- Shape the Eggs: Scoop 2 tablespoons of the filling and roll it into an oval shape. Place on a baking sheet lined with parchment paper.
- Freeze the Filling: Place the baking sheet in the freezer for 15-20 minutes.
- Prepare the Chocolate Coating: In a microwave-safe bowl, combine the chocolate wafers and coconut oil. Microwave in intervals until smooth, then mix in spirulina and matcha.
- Coat the Eggs: Insert a toothpick into the bottom of an egg, dip it in the melted chocolate, then place back on the parchment paper.
- Add the Speckles: Mix cocoa powder and water, then flick onto the eggs with a pastry brush.
- Chill Once More: Refrigerate until the chocolate hardens, about 10 minutes.
Notes
You can customize the chocolate type and fillings according to preference. Store in an airtight container for up to a week in the fridge.
Nutrition
- Serving Size: 1 egg
- Calories: 180
- Sugar: 10g
- Sodium: 50mg
- Fat: 12g
- Saturated Fat: 4g
- Unsaturated Fat: 6g
- Trans Fat: 0g
- Carbohydrates: 14g
- Fiber: 1g
- Protein: 3g
- Cholesterol: 0mg