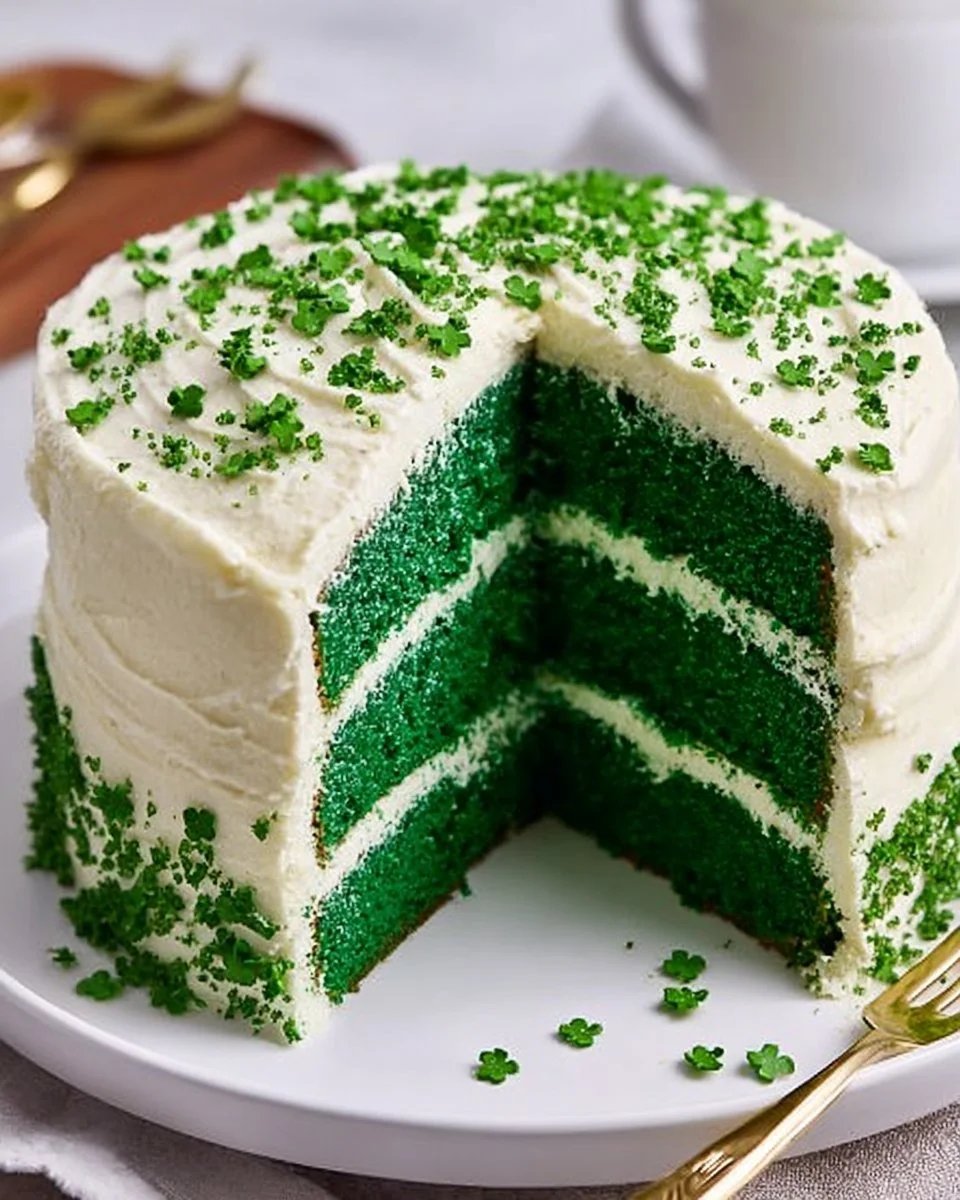
Indulging in a slice of Moist and Easy Green Velvet Cake feels like a joyous celebration in every bite. Imagine the first forkful: a buttercream-laden cloud of comfort that melts away the moment it touches your tongue. The delicate sweetness dances with notes of rich chocolate, while the vibrant green hue excites the eye, promising a delightful experience. As you savor this culinary marvel, the moist crumb teases your senses, giving way to an exquisite blend of buttery cream cheese frosting that lovingly hugs each layer.
The aroma wafts through the air, pulling everyone closer, urging them to join in the sweet anticipation. This isn’t just a cake; it’s an invitation to unite friends and family around the table. Each slice whispers stories of celebration, be it birthdays, holidays, or casual Sunday gatherings. The vibrant green evokes thoughts of renewal and growth, making it the perfect showstopper for any occasion. This cake is not only a delicious delight but also a feast for the eyes, turning simple celebrations into luxurious memories.
Why You’ll Love This Moist and Easy Green Velvet Cake
You’ll adore this Green Velvet Cake for its unique personality and mouthwatering flavor profile. Rich and moist yet light and fluffy, it transcends the ordinary and takes cake to an unparalleled level of joy. The luscious cream cheese frosting balanced gently with the earthy undertones of cocoa makes each bite a little piece of heaven. Ideal for celebrating with loved ones, this cake becomes the centerpiece, sparking smiles and enticing anyone nearby with its vibrant color and enticing aroma.
The beauty of this dessert lies in its versatility. While it shines splendidly at parties, you can also bake it just because—because some days deserve a special treat! Plus, this recipe is uncomplicated enough for beginners. With clear steps and accessible ingredients, you can effortlessly create a masterpiece that looks like it came from a high-end bakery. Once tasted, you’ll understand why this cake stands out; it’s more than just a dessert; it’s an experience brimming with love.
Preparation Phase & Tools to Use
To embark on this delightful baking journey, gathering the right tools makes all the difference. Here’s what you’ll need:
- Mixing Bowl: A sturdy, large bowl ensures you can mix without spills while keeping all your ingredients together. Look for a bowl with a wide base for stability.
- Stand Mixer or Hand Mixer: For the ultimate creaminess, using an electric mixer will make the task a breeze, whipping your butter and sugar into silky perfection.
- Measuring Cups and Spoons: Precision is key in baking. Invest in an accurate set for measuring your dry and wet ingredients—the right ratios elevate your cake!
- Two 9-Inch Cake Pans: These pans create the height and structure your cake needs. Remember to grease and flour them to guarantee easy cake release.
- Rubber Spatula: A flexible spatula helps in folding the batter gently without deflating it, ensuring that your cake remains light and airy.
- Wire Rack: For cooling, nothing beats a wire rack. This prevents soggy bottoms, allowing air to circulate around your cakes as they cool beautifully.
Preparation tip: Gather all your ingredients ahead of time, setting them out on your counter. This simplifies the process and ensures that you don’t forget anything essential while lost in the beautiful chaos of baking.
Ingredients for Moist and Easy Green Velvet Cake
- ½ cup salted butter, softened
- 1 cup vegetable oil
- 1¾ cups granulated sugar
- 3 large eggs
- 1 extra egg yolk
- 1 cup buttermilk
- 2 teaspoons pure vanilla extract
- 2–3 teaspoons green gel food coloring
- 3 cups cake flour, well measured
- 5 teaspoons cocoa powder
- ¾ teaspoon baking soda
- ¼ teaspoon baking powder
- 1 cup salted butter, softened (for the frosting)
- 4 8-oz. packages cream cheese, softened
- 8–9 cups powdered sugar, sifted
- 2–3 teaspoons milk (to adjust consistency for frosting)
- 3 teaspoons pure vanilla extract (for frosting)
Each ingredient brings its charm to the table. The buttermilk introduces a tangy richness and moisture to the cake, while the gel food coloring offers a lively touch that won’t alter the batter’s texture. If you’re looking for alternatives, you can use a dairy-free buttermilk substitute by combining non-dairy milk with vinegar.
How to Make Moist and Easy Green Velvet Cake
Preheat your oven to 350°F (175°C). Grease two 9-inch cake pans with butter and lightly dust them with flour.
-
In a large mixing bowl, beat together the softened butter, vegetable oil, and granulated sugar until the mixture becomes creamy, silky, and glossy. Take a moment to enjoy that heavenly buttery aroma. Scrape down the sides of the bowl to ensure a thorough blend.
-
Add the three eggs, one at a time, followed by the extra yolk, and stir in the vanilla extract. Mix until you achieve a silky batter that feels thick yet tender.
-
In a separate bowl, whisk together the cake flour, cocoa powder, baking soda, and baking powder. This step is essential for evenly distributing the dry ingredients, resulting in a beautifully light cake.
-
Gradually combine the dry mixture with the wet, alternating with the buttermilk. Start and end with the dry ingredients. Fold gently to keep the batter airy—this part is crucial, as overmixing will lead to a dense cake.
-
Now, the exciting part: the green gel food coloring! Add it a little at a time, mixing until you achieve your desired shade of green. Gel food coloring provides a rich hue without compromising the cake’s consistency.
-
Divide the batter evenly between your prepared pans, smoothing the tops gently with a spatula. Bake for 30 to 32 minutes or until a toothpick comes out clean, filling your kitchen with the most intoxicating aroma.
-
Once baked, allow the cakes to rest for a few minutes before transferring them onto a wire rack to cool fully. If the layers have domed, use a serrated knife to trim for an even stack.
-
For the frosting, beat together the cream cheese and the softened butter until creamy and soft. Gradually mix in the powdered sugar, one cup at a time, creating a smooth, dreamy frosting. Stir in the vanilla extract and add a splash of milk to reach your preferred consistency.
-
Once the cake layers have cooled, place the first layer on your serving plate. Spread a generous layer of frosting on top, then add the second layer. Frost the top and sides as desired, letting the frosting swirl and ripple. Enjoy the artistry of your creation with a slice of this joyful cake!
Chef’s Notes & Helpful Tips
- Make-ahead tips: You can prepare the cake layers a day in advance. Wrap them tightly in plastic wrap once cooled and store them in the refrigerator. Just ice them the day you plan to serve for fresher flavors!
- Cooking alternatives: If you want a quicker option, you can also bake this batter in cupcake form, reducing the baking time to about 20 minutes.
- Customization ideas: Feeling adventurous? Incorporate hints of mint or almond extract into your cream cheese frosting for a flavor twist. Top with sprinkles or edible glitter for a celebratory touch!
Common Mistakes to Avoid
Navigating the kitchen can be tricky, but avoiding a few common missteps will ensure your Green Velvet Cake turns out beautifully:
- Overmixing: Mixing the batter too much snuffs out the air bubbles, leading to a denser cake. Gently combine ingredients and stop as soon as no flour streaks remain.
- Incorrect oven temperature: Always preheat your oven thoroughly to get the perfect rise. An unheated oven can lead to undercooked centers while leaving edges overly browned.
- Not measuring ingredients accurately: Baking is a science! Use proper measuring cups for dry and liquid ingredients, and always level off your flour for an accurate measurement.
What to Serve With Moist and Easy Green Velvet Cake
This delightful cake pairs beautifully with various accompaniments, elevating your dessert experience. Here are a few ideas:
- Fresh Berries: Serve with strawberries or raspberries to balance the richness of the cake, bringing a tart freshness.
- Vanilla Ice Cream: A scoop of creamy vanilla ice cream contrasts wonderfully with the cake’s texture and sweetness.
- Whipped Cream: Light and airy whipped cream adds a luxurious touch to each bite while balancing flavors.
- Coffee: The robust flavors of coffee complement the sweetness of the cake, creating a lovely morning treat or afternoon pick-me-up.
- Spiced Chai: The warm spices in chai beautifully enhance the chocolate notes in the cake, offering a rich, comforting experience.
- Mint Leaves: A garnish of fresh mint leaves atop the frosting can bring a refreshing note to your slice.
Storage & Reheating Instructions
To keep your Moist and Easy Green Velvet Cake fresh:
- Refrigerator: Store leftovers in an airtight container in the fridge for up to 5 days. This keeps the frosting nice and creamy.
- Freezer: If you want to save some for later, wrap slices individually in plastic wrap and then place them in a freezer bag. They can last for about 3 months in the freezer.
- Reheating: Let cake slices come to room temperature before enjoying. If you prefer, warm them in the microwave for 10-15 seconds for that freshly-baked experience.
Estimated Nutrition Information
Approximate values per slice (makes about 12 slices):
- Calories: 482
- Total Fat: 26g
- Saturated Fat: 15g
- Cholesterol: 81mg
- Sodium: 252mg
- Total Carbohydrates: 56g
- Dietary Fiber: 1g
- Sugars: 42g
- Protein: 5g
(These figures are estimates and can vary based on ingredient brands and measurements.)
FAQs
1. Can I use a different coloring agent instead of gel food coloring?
Yes, you can use liquid food coloring, but it may require more to achieve the same vibrant shade. Be cautious not to add too much, as it can alter the cake’s texture.
2. What can I substitute for buttermilk?
A great substitute is mixing 1 cup of milk with 1 tablespoon of vinegar or lemon juice. Let it sit for about 5 minutes to curdle before using.
3. How can I make this cake dairy-free?
Use dairy-free butter and cream cheese alternatives and substitute the buttermilk with plant-based milk mixed with vinegar.
4. Is it necessary to frost the entire cake?
Frosting the entire cake is not mandatory! You can simply frost the top and leave the sides bare for a rustic look that still tastes divine.
5. Can I decorate the cake with fondant?
Absolutely! Ensure the frosting is firm enough to handle fondant smoothly. Ice the cake with a thicker layer of frosting before placing the fondant for a seamless finish.
Conclusion
Now that you’ve uncovered the secrets to creating a delectable Moist and Easy Green Velvet Cake, it’s time to roll up your sleeves and get baking. Make it for a special occasion, for an everyday treat, or just because you deserve a slice of happiness. With a cake so rich in flavor and vibrant in color, you’ll invite joy into your kitchen. The joy of sharing it with loved ones introduces unforgettable moments filled with smiles and laughter. Go ahead, indulge your senses, and let each bite tell your story of culinary success!
Print
Moist and Easy Green Velvet Cake
- Prep Time: 15 minutes
- Cook Time: 30 minutes
- Total Time: 45 minutes
- Yield: 12 servings 1x
- Category: Dessert
- Method: Baking
- Cuisine: American
- Diet: Vegetarian
Description
A vibrant and rich green velvet cake, layered with luscious cream cheese frosting, perfect for any celebration.
Ingredients
- ½ cup salted butter, softened
- 1 cup vegetable oil
- 1¾ cups granulated sugar
- 3 large eggs
- 1 extra egg yolk
- 1 cup buttermilk
- 2 teaspoons pure vanilla extract
- 2–3 teaspoons green gel food coloring
- 3 cups cake flour, well measured
- 5 teaspoons cocoa powder
- ¾ teaspoon baking soda
- ¼ teaspoon baking powder
- 1 cup salted butter, softened (for frosting)
- 4 8-oz. packages cream cheese, softened
- 8–9 cups powdered sugar, sifted
- 2–3 teaspoons milk (to adjust consistency for frosting)
- 3 teaspoons pure vanilla extract (for frosting)
Instructions
- Preheat your oven to 350°F (175°C). Grease two 9-inch cake pans with butter and lightly dust them with flour.
- Beat together the softened butter, vegetable oil, and granulated sugar until the mixture becomes creamy.
- Add the three eggs, one at a time, followed by the extra yolk, and stir in the vanilla extract.
- Whisk together the cake flour, cocoa powder, baking soda, and baking powder in a separate bowl.
- Combine the dry mixture with the wet, alternating with the buttermilk, folding gently.
- Add the green gel food coloring and mix until you achieve your desired shade.
- Divide the batter evenly between prepared pans and bake for 30 to 32 minutes.
- Allow the cakes to cool before transferring them onto a wire rack.
- Beat the cream cheese and softened butter for the frosting until creamy, then mix in the powdered sugar and vanilla extract.
- Spread frosting between and on top of the cooled cake layers.
Notes
Store leftovers in an airtight container in the refrigerator for up to 5 days.
Nutrition
- Serving Size: 1 slice
- Calories: 482
- Sugar: 42g
- Sodium: 252mg
- Fat: 26g
- Saturated Fat: 15g
- Unsaturated Fat: 8g
- Trans Fat: 0g
- Carbohydrates: 56g
- Fiber: 1g
- Protein: 5g
- Cholesterol: 81mg