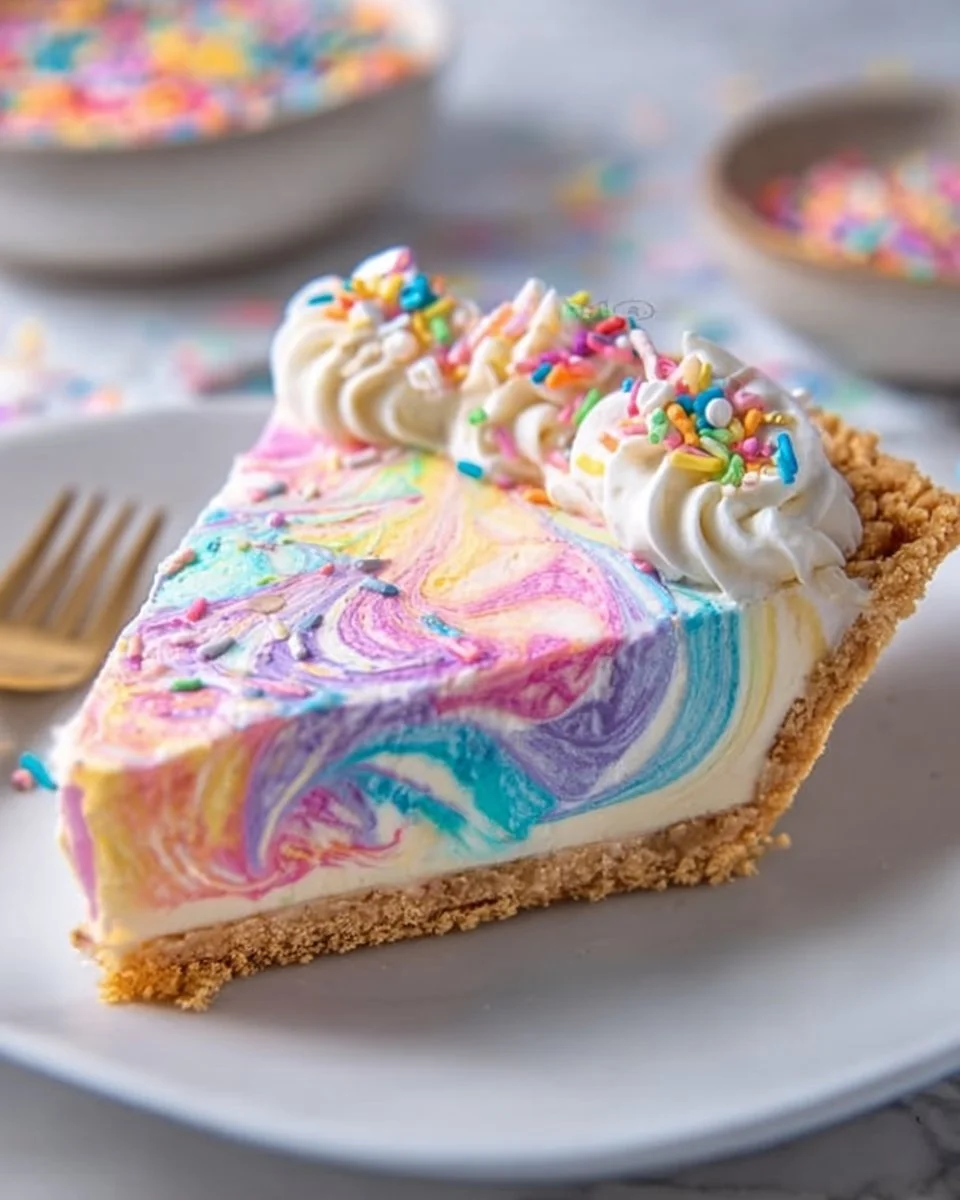
The aroma of freshly baked cake fills the air, creating an irresistible allure that beckons you closer. Picture a vibrant, sunlit kitchen where laughter dances around like spring butterflies. As you’d pull a golden-yellow cake from the oven, a soft puff of warmth envelopes you, making it impossible not to feel a rush of joy. A perfectly baked yellow poke cake, awaiting its transformation into a pastel masterpiece, invites anticipation. Each slice promises an explosion of flavor, with creamy swirls and fruity delights that celebrate the season beautifully.
The magic unfolds as you pierce the cake’s tender surface with a fork, creating inviting holes that eagerly await the sweetened condensed milk and electric pastel gelatin. The mingling of rich creaminess and fruity tang creates a delightful symphony that plays on your palate. Each bite bursts with sugary goodness, a charming reminder of childhood joy wrapped up in every mouthful. Topped with a glossy layer of whipped topping that captures whimsical coconut flakes and adorned with adorable candy eggs, this Easter Poke Cake not only looks magnificent but also captures the essence of the festive spirit.
Why You’ll Love This Easter Poke Cake
This Easter Poke Cake embodies everything that makes seasonal celebrations delightful. With its delightful combination of textures and flavors, you’ll find the moistness of the cake mingling perfectly with the creamy, fruity topping. The vibrant colors and whimsical decorations make it a showstopper for any gathering, whether it’s a holiday brunch, a family picnic, or a cheerful backyard barbecue.
Imagine the delight in your friends’ and family’s eyes as they dig into this beautiful creation. It tastes as good as it looks — a lively marriage of sweet, tangy, and creamy that dances across your taste buds. The retro poke cake style allows each portion to be a bit of a surprise, making it the edible equivalent of a delightful Easter egg hunt. With minimal effort, this cake yields maximum flavor and enjoyment, making it a recipe you’ll want to share.
Preparation Phase & Tools to Use
Before you dive into baking this delicious poke cake, gather a few essential tools that will make the process seamless.
- 9×13 Inch Baking Pan: A sturdy baking pan helps achieve an even bake and perfect texture for your cake.
- Mixing Bowls: You’ll want bowls both for mixing your cake batter and for the delicious toppings.
- Fork: This tool becomes your trusty sidekick, as you’ll poke holes into the cake to allow the sweet mixture to seep in.
- Whisk or Electric Mixer: Efficiently combine your cake mix and other wet ingredients with ease to create a smooth batter.
- Spatula: Use this for spreading the whipped topping evenly over your cake for that polished, festive look.
When prepping, keep these practical tips in mind: measure your ingredients accurately for the best results, make sure your eggs are at room temperature for a fluffy cake, and always allow your cake to cool slightly before poking so the mixture penetrates without becoming a soggy mess.
Ingredients for Easter Poke Cake
- 1 box yellow cake mix: This cake mix provides a buttery base that pairs beautifully with the toppings and keeps things simple.
- 1 cup water: Essential for hydrating the dry ingredients and creating a tender crumb.
- 1/3 cup vegetable oil: This adds moisture and richness to the cake.
- 3 large eggs: Eggs act as a binding agent, adding structure and richness.
- 1 can (14 oz) sweetened condensed milk: This creamy ingredient turns the cake into something special, ensuring decadence in every slice.
- 1 cup pastel-colored gelatin (e.g., Jell-O): Colorful and flavorful, this not only adds sweetness but also a fantastic visual appeal.
- 1 tub (8 oz) whipped topping: Light and fluffy, this provides a rich, eye-pleasing finish to your cake.
- 1 cup shredded coconut: A delightful, chewy texture that complements the creamy toppings.
- Candy eggs (for decoration): These add a playful and festive touch, embodying the joy of Easter.
Remember, substitutions are also possible! Opt for a different flavored cake mix to experiment with unique taste profiles or use dairy-free whipped topping if needed.
How to Make Easter Poke Cake
-
Preheat your oven to 350°F (175°C). Grease and flour a 9×13 inch baking pan to ensure your cake releases beautifully.
-
Prepare the cake mix according to the package directions, incorporating water, vegetable oil, and eggs. Mix until just combined — avoid overmixing to achieve a light and fluffy texture. Pour the batter into your prepared pan.
-
Bake in your preheated oven for 25-30 minutes or until a toothpick inserted in the center comes out clean. Enjoy the mouthwatering aroma wafting through your kitchen.
-
Once baked, let the cake cool for about 15 minutes. Take a fork and poke holes all over the top, allowing the sweetened condensed milk mixture to seep into every dip.
-
In a separate bowl, combine the sweetened condensed milk and gelatin until thoroughly mixed. Pour this vibrant concoction over your warm cake, ensuring it fills every hole.
-
Allow the cake to cool completely at room temperature, then refrigerate for at least 4 hours to let those flavors meld beautifully.
-
Once chilled, spread whipped topping generously over the entire cake surface. Sprinkle shredded coconut evenly across the top, adding a delightful texture and aesthetic charm.
-
Finally, decorate with candy eggs to create a cheerful centerpiece that will delight anyone lucky enough to enjoy it.
Chef’s Notes & Helpful Tips
- Make-ahead Tips: Bake the cake a day in advance! This allows the flavors to develop further and makes your baking day stress-free.
- Cooking Alternatives: If you’re pressed for time, consider making individual poke cups using cups or ramekins. They will also create an adorable, shareable dessert.
- Customization Ideas: You can swap the gelatin flavor to match your favorite color or taste. Lemon, strawberry, or blueberry flavors can offer unique twists that make the cake your own.
Common Mistakes to Avoid
- Not letting the cake cool: Allowing the cake to cool prevents the sweetened condensed milk from becoming too hot and losing moisture.
- Overmixing the batter: This results in a dense texture. Mix until just combined for a light and airy cake.
- Skipping the refrigeration step: Chilling the cake isn’t just for aesthetics! It helps the flavors meld together effectively.
What to Serve With Easter Poke Cake
Partner your Easter Poke Cake with complementary treats for a delightful spread:
- Fresh fruit salad: Bright, juicy fruits bring a refreshing contrast.
- Vanilla ice cream: A scoop amplifies the creaminess of the poke cake, making it extra indulgent.
- Whipped cream: Serve alongside it for an extra touch of creaminess.
- Coffee or tea: The warmth of brewed beverages balances the cake’s sweetness perfectly.
- Cheese platter: A variety of cheeses helps to cut through the cake’s richness.
- Chocolate-covered strawberries: These add a romantic touch along with luscious chocolate that pairs reassuringly with the cake’s softness.
Storage & Reheating Instructions
Store any leftover cake in an airtight container in the refrigerator for up to 3 days. To maintain its moist texture, avoid leaving it out at room temperature for extended periods. If you need to keep it longer, freeze individual slices wrapped in plastic and foil for up to 2 months. Let it thaw in the refrigerator before serving or enjoy it chilled straight from the freezer for a deliciously refreshing treat.
Estimated Nutrition Information
Approximate values per slice (1/12 of cake):
- Calories: 280
- Protein: 3g
- Total Fat: 10g
- Saturated Fat: 6g
- Carbohydrates: 44g
- Fiber: 0g
- Sugar: 25g
Nutrition varies by ingredients used, and this is an estimation only.
FAQs
1. Can I use a different cake mix flavor?
Absolutely! Feel free to experiment with chocolate, lemon, or even spice cake mixes. Each variation can bring a delightful twist to this classic dessert.
2. Can I use homemade whipped topping instead of store-bought?
Yes! Homemade whipped cream elevates the treat with a fresher taste. Just ensure it’s stiff enough to spread easily without collapsing.
3. How can I make this gluten-free?
Opt for a gluten-free cake mix to cater to gluten-sensitive friends and family. Just be careful to check all other ingredients!
4. Can I use sugar-free gelatin and condensed milk?
Certainly! Substituting for sugar-free options allows you to enjoy this treat while reducing sugar intake. Just remember, the flavor might be slightly different!
5. How do I achieve vibrant gelatin colors?
If you want to intensify the colors, consider using multiple gelatin flavors and layering them to create a festive striped effect in the cake.
Conclusion
Easter Poke Cake captures the essence of springtime joy wrapped in soft cake and vivid colors, promising delightful memories with every slice. This scrumptious dessert embodies the celebration of life, love, and laughter, inviting friends and family to gather around the table for sweet moments. Why not bring a little magic into your kitchen and create this delightful treat? It’s time to dive into a slice — the festivities await!
Print
Easter Poke Cake
- Prep Time: 15 minutes
- Cook Time: 30 minutes
- Total Time: 4 hours 45 minutes
- Yield: 12 servings 1x
- Category: Dessert
- Method: Baking
- Cuisine: American
- Diet: Vegetarian
Description
A colorful Easter Poke Cake with a buttery yellow base, sweetened condensed milk infusion, and topped with whipped cream, coconut, and candy eggs for a festive delight.
Ingredients
- 1 box yellow cake mix
- 1 cup water
- 1/3 cup vegetable oil
- 3 large eggs
- 1 can (14 oz) sweetened condensed milk
- 1 cup pastel-colored gelatin (e.g., Jell-O)
- 1 tub (8 oz) whipped topping
- 1 cup shredded coconut
- Candy eggs (for decoration)
Instructions
- Preheat your oven to 350°F (175°C). Grease and flour a 9×13 inch baking pan.
- Prepare the cake mix according to the package directions, incorporating water, vegetable oil, and eggs. Mix until just combined.
- Pour the batter into your prepared pan.
- Bake for 25-30 minutes or until a toothpick inserted in the center comes out clean.
- Let the cake cool for about 15 minutes. Poke holes all over the top with a fork.
- Combine sweetened condensed milk and gelatin until thoroughly mixed. Pour over the warm cake.
- Chill the cake completely at room temperature, then refrigerate for at least 4 hours.
- Spread whipped topping over the cake and sprinkle shredded coconut on top.
- Decorate with candy eggs for a festive look.
Notes
For a different flavor, try a chocolate or lemon cake mix. Make-ahead tips: Bake a day in advance to enhance flavors.
Nutrition
- Serving Size: 1 slice
- Calories: 280
- Sugar: 25g
- Sodium: 200mg
- Fat: 10g
- Saturated Fat: 6g
- Unsaturated Fat: 4g
- Trans Fat: 0g
- Carbohydrates: 44g
- Fiber: 0g
- Protein: 3g
- Cholesterol: 70mg