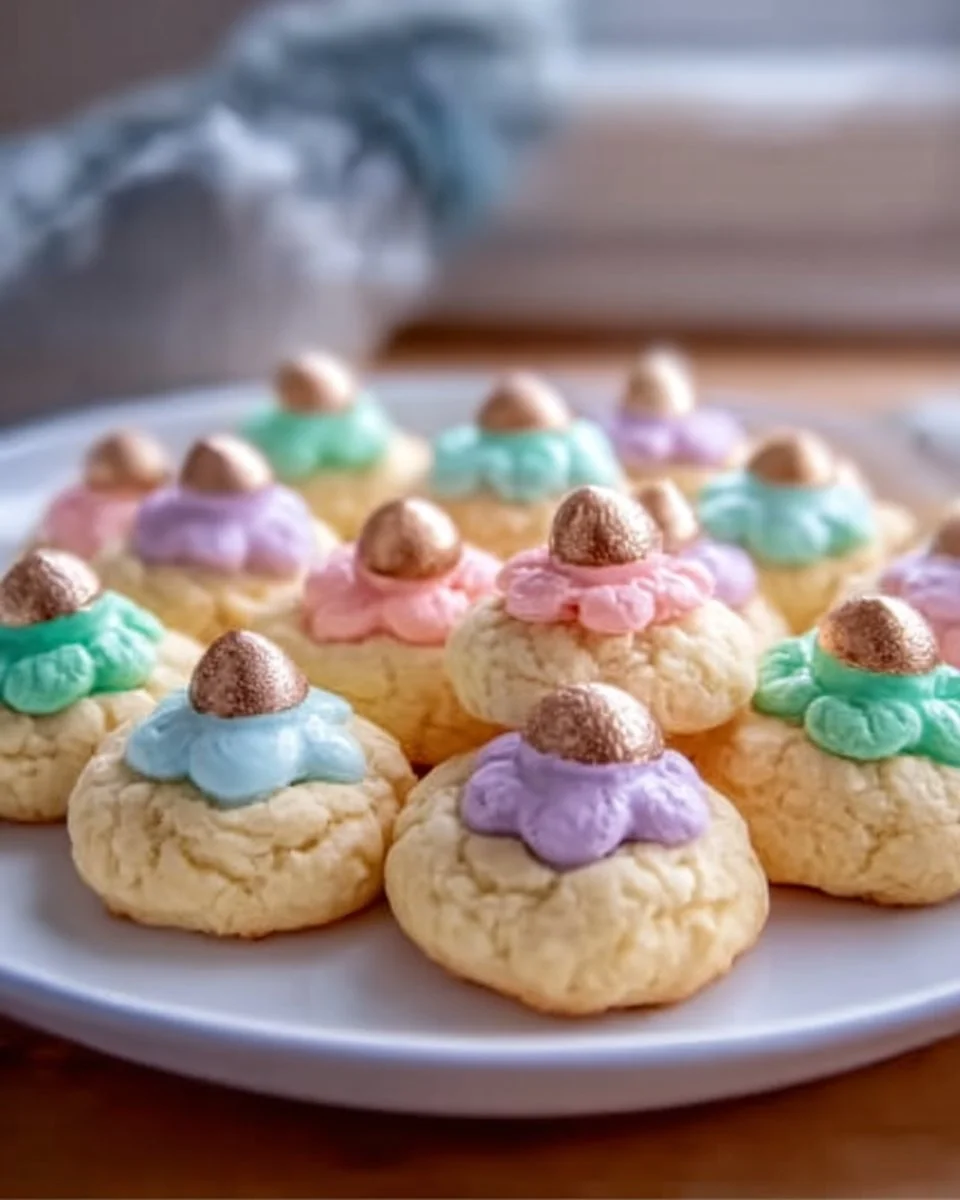
The first bite of an Easter Blossom Cookie feels like sunshine on your tongue: a tender, buttery crumb that gives way to a crisp sugared shell and a molten ribbon of chocolate waiting in the center. These cookies marry chewy, pillowy centers with a delicate crunch from pastel sanding sugar, and the little chocolate kiss tucked into each one creates a moment of delightful surprise. They smell faintly of vanilla and warm butter as they emerge from the oven, and the pastel sparkle makes them irresistible at any spring gathering.
Pull one from the plate while they’re still slightly warm and the kiss has softened but not completely melted — the heat blooms the chocolate without swallowing it, and you taste the contrast of sugar, butter, and pure chocolate. If you dream of cookies that look festive, hold their shape, and please kids and adults alike, these are the kind you go back to again and again. Pair them with a bright brunch board or tuck them into baskets; they brighten an ordinary day into a small celebration. For a savory-sweet brunch companion, try an easy breakfast crunchwrap to balance the sweetness.
Why You’ll Love This Easter Blossom Cookies
These cookies deliver everything you want from spring baking: they look like little bouquets with pastel sugar, taste like comforting butter cookies, and surprise with a decadent chocolate center. The texture hits all the right notes — slightly crisp edges, tender chew inside, and a creamy chocolate center that softens without turning to a puddle. They hold together beautifully during baking, so they stack neatly for gifting and plate beautifully for parties.
They shine at spring celebrations (Easter egg hunts, tea parties, school potlucks) because they’re visually festive and universally appealing. The recipe keeps things simple — pantry staples plus pastel sanding sugar and chocolate kisses — so you can whip them up in an afternoon. And because they travel well and freeze beautifully, they make excellent make-ahead treats that still taste freshly baked.
Preparation Phase & Tools to Use
Good cookies begin with the right tools, and each one makes the process easier and the result more consistent.
- Stand mixer or handheld mixer: Creams the butter and sugar evenly and saves your arm. If you don’t have one, mix vigorously by hand with a wooden spoon for a few extra minutes.
- Mixing bowls: Use one medium bowl for wet ingredients and one for dry. Clear bowls help you see when ingredients are fully incorporated.
- Measuring cups and spoons: Accurate measurements keep texture consistent — especially for flour.
- Baking sheets lined with parchment paper or silicone mats: Prevent sticking and promote even browning.
- Cookie scoop (1–1.5 tablespoon): Produces uniform cookies that bake at the same rate.
- Cooling rack: Lets air circulate so cookies don’t steam and become soggy.
- Small bowl for sanding sugar: Makes rolling quick and tidy.
Practical preparation tips:
- Soften butter to room temperature but keep it cool enough to hold shape when scooped. Press gently — it should leave an impression but not be greasy or melting.
- Pre-measure dry ingredients to streamline assembly.
- Line baking sheets before you start to avoid interruptions while the oven is on.
Ingredients for Easter Blossom Cookies
- 1 cup unsalted butter (softened)
- 1 cup granulated sugar
- 1 large egg (at room temperature)
- 1 teaspoon vanilla extract
- 2 cups all-purpose flour
- 1 teaspoon baking powder
- 1 cup pastel sanding sugar
- 24 pieces chocolate kisses
Key ingredient notes and substitutions:
- Unsalted butter: Lets you control sodium. If all you have is salted, omit any added salt in the recipe or reduce other salty ingredients. You can substitute half butter/half shortening for slightly softer cookies, but butter gives the best flavor.
- Granulated sugar: Creates that classic slightly crisp exterior. For a deeper flavor, swap half for light brown sugar to add chew and a hint of caramel.
- Egg: Adds structure and moisture. For an egg-free variation, use a commercial egg replacer or a flax “egg” (1 tablespoon ground flax + 3 tablespoons water, chilled) but expect a slightly denser texture.
- Vanilla extract: Adds aromatic warmth. Try almond extract for a different twist — use half the amount because it’s stronger.
- All-purpose flour and baking powder: Provide structure and lift. For a gluten-free version, substitute a 1:1 gluten-free flour blend that includes xanthan gum.
- Pastel sanding sugar: Adds festive crunch and sparkle. You can use colored sugar crystals or finely crushed pastel candy.
- Chocolate kisses: Traditional and convenient. Substitute with mini chocolate chips (press a few into warm cookies) or use peanut butter cups for a richer filling — watch baking time and press immediately.
How to Make Easter Blossom Cookies
Preparation
Follow these clear, step-by-step instructions to produce consistent, bakery-quality blossoms.
-
Preheat the oven and prepare pans:
- Preheat oven to 350°F (175°C). Line two baking sheets with parchment paper or silicone baking mats.
- Arrange your sanding sugar in a shallow bowl for easy rolling.
-
Cream butter and sugar:
- In a large bowl, beat 1 cup softened unsalted butter and 1 cup granulated sugar on medium speed until pale and fluffy, about 2–3 minutes. Scrape the sides of the bowl occasionally.
- Tip: Creaming incorporates air, giving a lighter cookie. Stop once you see a noticeably lighter color.
-
Add egg and vanilla:
- Beat in 1 large room-temperature egg and 1 teaspoon vanilla extract until just combined. Mix briefly to avoid overbeating, which can make cookies tough.
-
Combine dry ingredients and mix:
- In a separate bowl, whisk together 2 cups all-purpose flour and 1 teaspoon baking powder.
- Gradually add the dry mixture to the wet, mixing on low until a soft dough forms. Don’t overmix; stop when no streaks of flour remain.
-
Scoop and roll:
- Using a 1–1.5 tablespoon cookie scoop, portion dough into uniform balls. Roll each ball gently between your palms, then roll in the pastel sanding sugar until fully coated.
-
Bake:
- Place dough balls about 2 inches apart on prepared baking sheets. Bake in the preheated oven for 8–10 minutes, until the edges set and the tops barely begin to crack but are still pale. The centers should look slightly underbaked — they set as they cool.
- Tip: Rotate pans halfway through baking for even color.
-
Press in chocolate kisses:
- Remove cookies from oven. Immediately press one chocolate kiss into the center of each cookie, pushing down slightly so it nests into the soft center. The heat will soften the chocolate without melting it into a puddle.
-
Cool:
- Transfer cookies to a cooling rack after 3–4 minutes to finish setting. Allow at least 15–20 minutes before stacking or packaging.
Small tips within steps:
- If your butter is too soft and dough looks greasy, chill the dough for 10–15 minutes before scooping.
- For perfectly centered kisses, gently press the chocolate into the cookie using the back of a teaspoon.
Chef’s Notes & Helpful Tips
Make-ahead tips:
- Dough: Shape dough into balls, arrange on a baking sheet, freeze solid, then transfer to a freezer-safe bag for up to 3 months. Bake from frozen; add 1–2 minutes to baking time.
- Fully baked cookies: Freeze baked cookies in a single layer on a tray, then transfer to airtight containers for up to 3 months. Thaw at room temperature.
Cooking alternatives:
- Air fryer: Preheat to 325°F (165°C). Place 4–6 cookies in the basket lined with perforated parchment; cook 6–8 minutes, check for light set, then press chocolate kisses in immediately. Do not overcrowd.
- Convection oven: Reduce temperature by 25°F and watch carefully; baking time may shorten by a minute or two.
Customization ideas:
- Swap chocolate kisses for peanut butter kisses, caramel-filled chocolates, or mini peanut butter cups for flavor variation.
- Add 1/2 teaspoon lemon zest to the batter for a bright spring note.
- Fold in 1/3 cup chopped toasted almonds or pistachios for added crunch.
- Make them larger or smaller: adjust baking time (smaller cookies 6–8 minutes; larger 10–12 minutes).
Common Mistakes to Avoid
- Using melted butter: Melted butter creates flat, greasy cookies. Soften butter to room temperature — warm but still holding shape.
- Overmixing the dough: Mixing too long after adding flour develops gluten and yields dense, tough cookies. Stir until just combined.
- Overbaking: These cookies look slightly underdone when perfect. Pull them when edges set and centers are still pale to keep them tender and chewy.
- Pressing the chocolate too soon or too hard: Press into warm cookies right after they exit the oven. Pressing too much will flatten the cookie; waiting too long means the chocolate won’t adhere.
- Uneven scooping: Uneven dough balls bake inconsistently. Use a cookie scoop for uniformity.
What to Serve With Easter Blossom Cookies
Pairings that complement the buttery-sweet and chocolate notes:
- Cold milk: Classic and comforting — the cool creaminess mellows sweetness.
- Hot tea (Earl Grey or chamomile): Tea’s floral and citrus notes balance richness.
- Coffee (latte or cappuccino): A strong coffee brightens the chocolate center.
- Fresh fruit salad: Berries and citrus add bright acidity and texture contrast.
- Vanilla bean ice cream: Serve a warm cookie alongside a scoop for a warm-and-cold dessert.
- Lemon bars or citrus tarts: Add a tart counterpoint for a dessert spread.
- Brunch board with savory cheeses and prosciutto: Create sweet-and-savory balance for daytime gatherings.
- Sparkling wine or rosé: Bubbles cleanse the palate and elevate celebration moments.
Storage & Reheating Instructions
Fridge:
- Store cooled cookies in an airtight container with parchment between layers for up to 5 days. The chocolate will firm in the fridge.
Freezer:
- Freeze unbaked dough balls or baked cookies. For baked cookies, flash-freeze on a sheet then transfer to a sealed container for up to 3 months. For dough balls, bake from frozen and add a minute or two to the baking time.
Reheating:
- Microwave: Heat one cookie for 7–10 seconds to soften the chocolate slightly; beware of overheating which will melt the chocolate too much.
- Oven: Preheat to 300°F (150°C). Place cookies on a baking sheet for 3–5 minutes until warm. This method preserves texture best.
- Air fryer: 1–2 minutes at 300°F for gentle warming; watch closely to prevent melting.
Estimated Nutrition Information
Approximate per cookie (based on 24 cookies from recipe):
- Calories: 140–160 kcal
- Fat: 8–9 g (saturated fat ~5 g)
- Carbohydrates: 18–20 g (sugars ~11–13 g)
- Protein: 1.5–2 g
- Fiber: <1 g
These are estimates for guidance only and vary with the exact ingredients and size of your cookies. For precise nutrition, input your brands and quantities into a nutrition calculator.
FAQs
Q: Can I make these cookies without chocolate kisses?
A: Yes. You can press in 6 mini chocolate chips or a small dollop of chocolate spread after baking. If you skip the chocolate entirely, try stamping a small well in the center and filling with jam for a jam-filled blossom variation.
Q: My cookies spread too much. What went wrong?
A: Likely causes include over-softened or melted butter, too much sugar, or baking sheets that were not cooled between batches. Chill the dough for 10–20 minutes if your kitchen is warm, and ensure butter is softened but not oily.
Q: How do I get an even pastel coating with sanding sugar?
A: Roll each dough ball firmly but gently in the sanding sugar so it adheres in an even layer. If the sugar slips off, lightly wet your fingertips and pat the dough before rolling, or chill the dough briefly to firm it.
Q: Are these cookies suitable for kids’ classroom events?
A: Absolutely — they’re colorful, easy to handle, and individually portioned. Check for allergy restrictions (chocolate/peanut concerns) and consider using wrappers or serving on platters covered with parchment.
Q: Can I make these vegan?
A: You can adapt them: use a vegan butter substitute, replace the egg with a flax egg (1 tbsp ground flax + 3 tbsp water), and pick dairy-free chocolate kisses. Expect a slightly different texture — usually denser and a bit more crumbly.
Q: Why did my kisses melt into the cookie?
A: If you press the chocolate into the cookie while it’s extremely hot for too long, the kiss may fully collapse. Remove the cookies after the recommended 3–4 minutes and press gently so the chocolate softens and nests but keeps its shape.
Q: How do I keep these cookies from getting stale?
A: Store them in an airtight container at room temperature with a slice of bread to help retain moisture for a day or two. For longer storage, freeze and thaw as needed.
Conclusion
These Easter Blossom Cookies capture the warmth of spring in every bite: tender, buttery dough, a candy-sparkled crust, and a chocolatey surprise that beckons you to take one more. They feel festive straight from the oven and travel perfectly for gifting or party platters. If you love exploring other candy-forward bakes, check out The Great Big List of M&M’s Desserts for more sweet inspiration. Bake a batch, invite friends, and watch these little blossoms disappear in no time — they make spring a bit sweeter.
Print
Easter Blossom Cookies
- Prep Time: 15 minutes
- Cook Time: 10 minutes
- Total Time: 25 minutes
- Yield: 24 cookies 1x
- Category: Dessert
- Method: Baking
- Cuisine: American
- Diet: Vegetarian
Description
Delightful buttery cookies topped with chocolate kisses and coated in festive pastel sanding sugar, perfect for spring gatherings.
Ingredients
- 1 cup unsalted butter (softened)
- 1 cup granulated sugar
- 1 large egg (at room temperature)
- 1 teaspoon vanilla extract
- 2 cups all-purpose flour
- 1 teaspoon baking powder
- 1 cup pastel sanding sugar
- 24 pieces chocolate kisses
Instructions
- Preheat the oven to 350°F (175°C) and line two baking sheets with parchment paper.
- Cream the butter and sugar on medium speed until pale and fluffy, about 2–3 minutes.
- Add the egg and vanilla extract, mix until just combined.
- Combine the flour and baking powder in a separate bowl, then gradually mix into the wet ingredients until a soft dough forms.
- Scoop dough into uniform balls and roll in pastel sanding sugar.
- Bake for 8–10 minutes until edges are set and tops barely crack.
- Press a chocolate kiss into the center of each cookie immediately after removing from the oven.
- Cool the cookies on a cooling rack for 15–20 minutes before serving.
Notes
These cookies make excellent make-ahead treats and travel well. Store in an airtight container for up to 5 days.
Nutrition
- Serving Size: 1 cookie
- Calories: 150
- Sugar: 12g
- Sodium: 65mg
- Fat: 8g
- Saturated Fat: 5g
- Unsaturated Fat: 3g
- Trans Fat: 0g
- Carbohydrates: 20g
- Fiber: 0g
- Protein: 2g
- Cholesterol: 30mg