Opening Description
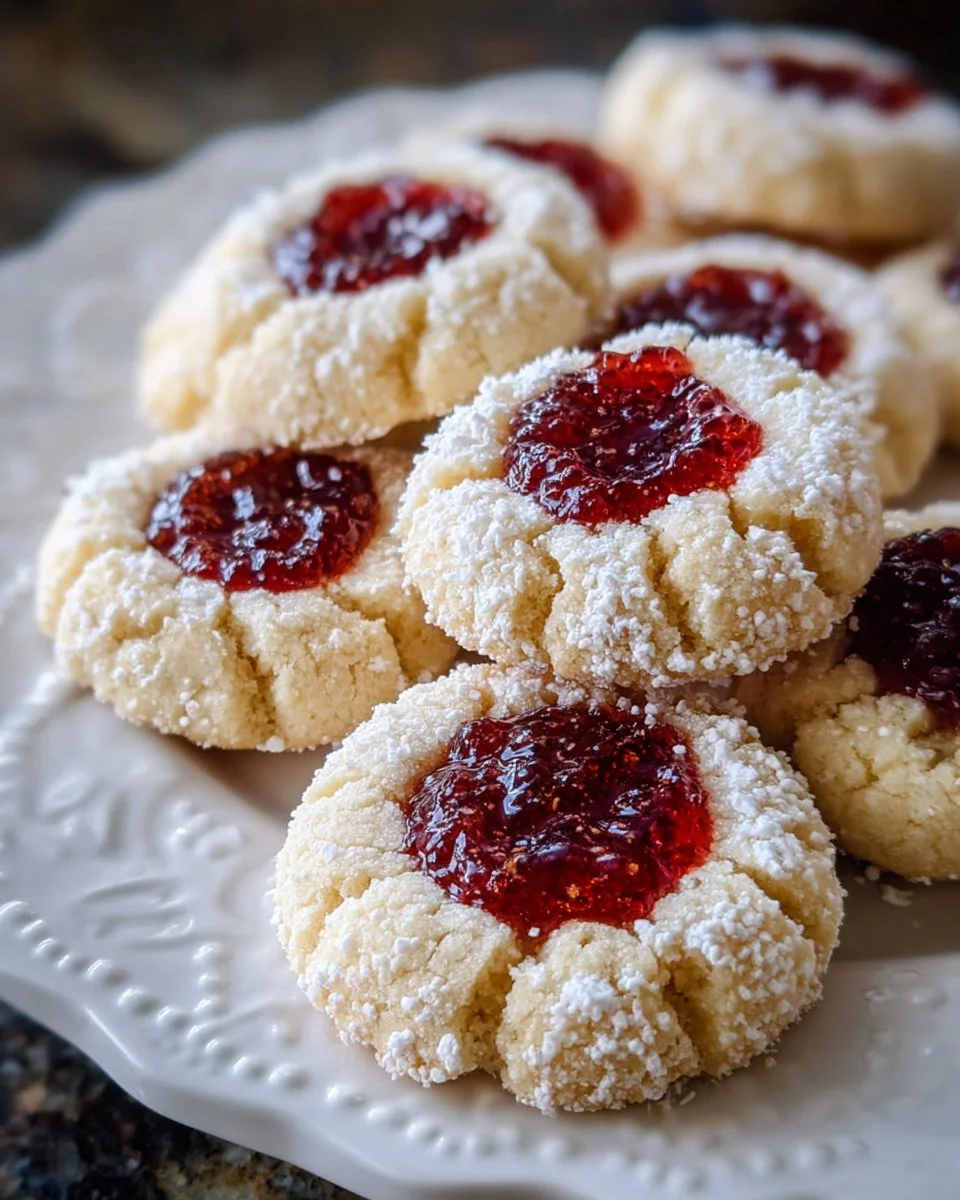
There’s something undeniably charming about cookies, especially when they cradle a delightful dollop of jelly in the center. Imagine sinking your teeth into a jelly thumbprint cookie – its crisp edges give way to a soft, buttery interior that melts in your mouth. Each bite bursts with flavor and texture; the rich sweetness of the jam dances against the backdrop of the tender cookie, evoking memories of family gatherings and cozy afternoons spent in the kitchen. The aroma wafting through the air as they bake can transform any ordinary day into an occasion to celebrate.
The beauty of jelly thumbprint cookies, aside from their irresistible taste, lies in their versatility. You can adapt them to any season or celebration, allowing your creativity to shine. With a simple base of ingredients, these treats provide the perfect canvas for your favorite fruit jams—from the tartness of raspberry to the sunny sweetness of apricot. Each cookie tells its own story, inviting friends and family to indulge in their delightful charm.
Why You’ll Love This Jelly Thumbprint Cookies
These aren’t just any cookies; they’re a nostalgic reminder of childhood and the sweet simplicity of homemade treats. Jelly thumbprint cookies stand out because they effortlessly blend rich flavors and textures while being remarkably easy to prepare. Each one showcases a tiny pocket of fruity goodness that can evoke smiles, conversations, and heartwarming moments.
Whether you bake them for a festive occasion or to enjoy with your morning coffee, these cookies will impress your loved ones with their homemade warmth. They make for graceful gifts, or simply an afternoon snack, enhancing any gathering with their comforting presence. Plus, their beautiful appearance, with vibrant colors peeking through the thumbprint, adds an artistic touch to your cookie platter, making them incredibly appealing.
Preparation Phase & Tools to Use
Creating perfect jelly thumbprint cookies is a delightful experience, and having the right tools can elevate your baking game. Here’s what you need:
- Mixing Bowl: A large mixing bowl provides ample space for both mixing the ingredients and the joy of kneading.
- Hand Mixer or Stand Mixer: This tool takes the effort out of creaming the butter and sugar, ensuring they achieve that light, airy texture essential for cookies.
- Cookie Scoop: A small cookie scoop allows for uniform dough portions, ensuring all your cookies bake evenly.
- Parchment Paper: Lining your baking sheets with parchment prevents sticking, making cleanup a breeze.
- Wire Rack: As your cookies cool, this rack ensures air circulates around them, helping maintain that perfect texture.
Preparation Tips:
- Always soften your butter to room temperature before starting; it ensures easy creaming and a tender cookie.
- Pre-measure your ingredients to streamline the process—this keeps you organized and focused on the joy of baking.
Ingredients for Jelly Thumbprint Cookies
- 1 cup unsalted butter, softened: Butter adds richness and flavor, creating a tender crumb.
- 2/3 cup granulated sugar: This sweetener helps to balance flavors while contributing to the cookie’s texture.
- 1 teaspoon vanilla extract: A splash of vanilla lends warmth and depth, enhancing the overall taste.
- 2 cups all-purpose flour: The base of your cookie, providing structure and a light texture.
- 1/2 teaspoon salt: A pinch of salt enhances sweetness and balances flavors exquisitely.
- 1/2 cup fruit jelly or jam (your choice): This flavorful centerpiece can be customized, making each batch uniquely delicious.
- 1 tablespoon powdered sugar (optional, for dusting): Light dusting adds an elegant finish, enhancing visual appeal.
You can substitute the butter with margarine or use coconut oil for a dairy-free version. Experiment with different types of jams or jellies according to your taste preferences or seasonal fruits!
How to Make Jelly Thumbprint Cookies
Embark on a culinary adventure! Here’s a step-by-step guide to whipping up these delicious jewels:
-
Preheat Your Oven: Set your oven to 350°F (175°C) and line two baking sheets with parchment paper for easy cleanup.
-
Cream Butter and Sugar: In a large mixing bowl, blend the softened butter and granulated sugar using a hand mixer or stand mixer. Mix until the mixture appears light and fluffy (around 2-3 minutes).
-
Add Vanilla: Beat in the vanilla extract, ensuring it’s well incorporated into the butter mixture.
-
Incorporate Dry Ingredients: Sift in the flour and sprinkle the salt. Mix on low speed until you create a soft, cohesive dough. Avoid over-mixing to maintain tenderness.
-
Shape the Dough: Using a small cookie scoop or your hands, portion out the dough and roll each piece into a smooth ball. Arrange the dough balls about 2 inches apart on your prepared baking sheets.
-
Create Indents: With your thumb (or the back of a teaspoon), gently press into the center of each dough ball, creating a small well. Be careful not to push all the way through!
-
Fill with Jelly: Spoon approximately 1/2 teaspoon of your chosen jelly or jam into the well of each cookie, being cautious not to overfill.
-
Bake: Place the cookies in the oven and bake for 12-14 minutes, or until the edges turn a light golden color.
-
Cool: Let the cookies cool on the baking sheets for about 5 minutes before gently transferring them to a wire rack to cool completely.
-
Dust & Enjoy: Once cooled, dust with powdered sugar, if desired, and delight in every bite.
Chef’s Notes & Helpful Tips
- Make-Ahead Tips: Prepare the dough in advance, forming it into balls and freezing them. When ready to bake, simply take them out and add a few minutes to the baking time.
- Cooking Alternatives: If you have an air fryer, these cookies can also be cooked there! Preheat to 320°F (160°C) and cook for about 8-10 minutes, checking for that beautiful golden edge.
- Customization Ideas: Feel free to experiment with flavored extracts (almond or lemon) for a unique twist. Alternatively, consider mixing in finely chopped nuts for an added texture.
Common Mistakes to Avoid
- Overmixing the Dough: Mixing too long can lead to tougher cookies. Once the ingredients are combined, stop and keep them soft.
- Overfilling the Indents: A well-filled thumbprint allows for that perfect ratio of cookie to jam. Overfilling can lead to overflow during baking.
- Not Cooling Properly: Removing cookies while too hot can cause them to break. Allow them to firm slightly on the baking sheet first.
What to Serve With Jelly Thumbprint Cookies
These delightful cookies pair beautifully with various treats:
- Coffee: The bitter notes of coffee perfectly balance the sweetness of the cookies.
- Tea: A warm cup of herbal or black tea enhances the flavor experience, perfect for an afternoon snack.
- Milk: Nothing beats the classic combination of cookies and milk; it creates a nostalgic moment as you savor each bite.
- Ice Cream: Serve alongside vanilla or berry-flavored ice cream for a creamy contrast.
- Fresh Fruit: A side of fresh fruit like berries or slices of citrus enhances flavors while adding freshness.
- Cheese Plate: A simple cheese platter with mild cheeses complements the sweetness of the cookies beautifully.
Storage & Reheating Instructions
Store your jelly thumbprint cookies in an airtight container at room temperature for up to a week. If you want to keep them longer, consider freezing them. Place the baked cookies in a single layer in a freezer-safe container for up to three months. When you’re ready to enjoy them again, simply thaw at room temperature, or warm them in the microwave for a few seconds to refresh their luscious texture.
Estimated Nutrition Information
(Approximate per cookie, assuming 24 cookies)
- Calories: 90
- Total Fat: 5g
- Saturated Fat: 3g
- Cholesterol: 20mg
- Sodium: 50mg
- Total Carbohydrates: 11g
- Dietary Fiber: 0g
- Sugars: 4g
- Protein: 1g
Nutrition values may vary based on specific ingredients used.
FAQs
1. Can I use different types of jams?
Absolutely! Explore your favorites—raspberry, blackberry, or even lemon curd can work beautifully. Experimenting allows you to find your perfect match!
2. How do I prevent the cookies from spreading too much?
Ensure your butter is softened, not melted, and chill the dough for 15-30 minutes before baking to help maintain their shape.
3. Can I make these cookies gluten-free?
Yes! Substitute all-purpose flour with a 1:1 gluten-free baking blend. Just make sure your other ingredients are gluten-free as well.
4. How can I make these cookies more festive?
Add colorful sprinkles on top before baking, or incorporate holiday-themed jams for a seasonal twist.
5. What if my dough is too crumbly?
If your dough seems too dry and crumbly, add a teaspoon of milk at a time until it comes together nicely without being sticky.
Conclusion
Embrace the joy of baking with these best jelly thumbprint cookies! Their sweet allure, paired with warm memories wrapped around each bite, makes them a true delight to create and indulge in. Invite the spirit of sharing into your kitchen, and watch as these mouthwatering cookies become a favorite in your home. So, gather your ingredients, preheat that oven, and prepare to savor the smiles these delightful treats will bring. Get baking today!
Print
Jelly Thumbprint Cookies
- Prep Time: 15 minutes
- Cook Time: 14 minutes
- Total Time: 29 minutes
- Yield: 24 servings 1x
- Category: Dessert
- Method: Baking
- Cuisine: American
- Diet: Vegetarian
Description
Delightful jelly thumbprint cookies with a buttery texture and fruity center, perfect for any occasion.
Ingredients
- 1 cup unsalted butter, softened
- 2/3 cup granulated sugar
- 1 teaspoon vanilla extract
- 2 cups all-purpose flour
- 1/2 teaspoon salt
- 1/2 cup fruit jelly or jam (your choice)
- 1 tablespoon powdered sugar (optional, for dusting)
Instructions
- Preheat your oven to 350°F (175°C) and line two baking sheets with parchment paper.
- Cream the softened butter and granulated sugar in a large mixing bowl until light and fluffy (around 2-3 minutes).
- Add the vanilla extract and mix until well incorporated.
- Incorporate the flour and salt, mixing on low speed until a soft dough forms.
- Shape the dough into smooth balls and place them on the prepared baking sheets.
- Create indents in the center of each ball with your thumb.
- Fill each indent with about 1/2 teaspoon of jelly or jam.
- Bake for 12-14 minutes or until the edges are light golden.
- Cool on the baking sheets for 5 minutes before transferring to a wire rack.
- Dust with powdered sugar, if desired, and enjoy!
Notes
You can substitute butter with margarine or coconut oil for a dairy-free version.
Nutrition
- Serving Size: 1 cookie
- Calories: 90
- Sugar: 4g
- Sodium: 50mg
- Fat: 5g
- Saturated Fat: 3g
- Unsaturated Fat: 2g
- Trans Fat: 0g
- Carbohydrates: 11g
- Fiber: 0g
- Protein: 1g
- Cholesterol: 20mg