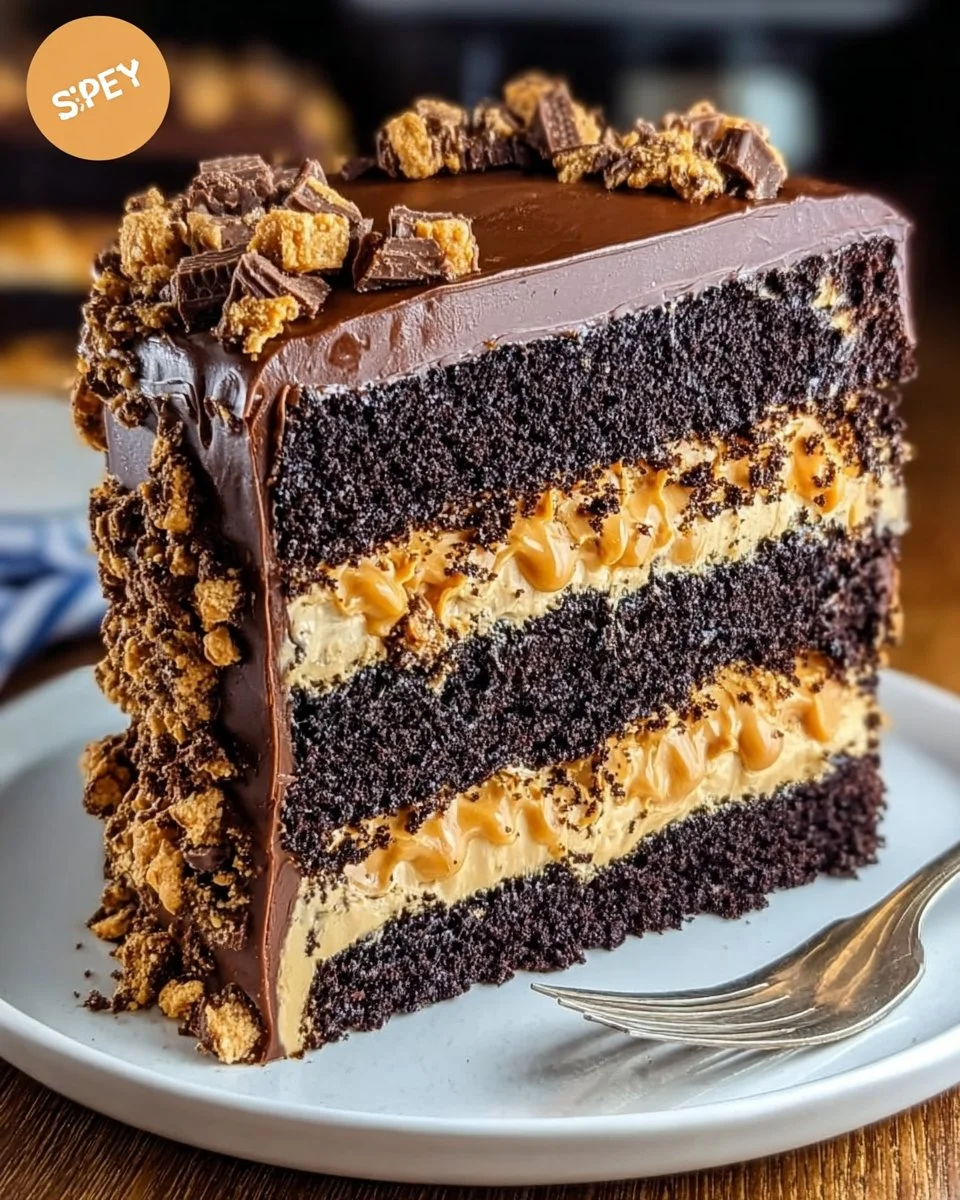
Imagine walking into a kitchen filled with the rich aroma of chocolate mingling with the unmistakable scent of peanut butter. Your heart races as you approach a counter laden with a decadence that promises to excite your taste buds—a Butterfinger Bomb Cake Dessert, a sensational fusion of flavors that brings joy with every bite. The allure of moist, chocolatey cake layered with a creamy, dreamy peanut butter filling is simply irresistible. And let’s not forget the delightful crunch from the crumbled Butterfinger bars, giving this dessert a textural contrast that keeps you coming back for more.
As you slice into this marvel, the cake reveals its intricate layers, each bringing a luscious combination of sweetness and a hint of saltiness from the peanut butter. The creamy filling contrasts perfectly with the soft, rich cake, creating a dessert experience that is not just eaten, but savored. Every bite unveils a story—a celebration of textures: the dense chocolate, the smooth whipped cream, and the delightful crunch of candy. It’s like indulging in a party of flavors that are daring yet familiar, nostalgic yet adventurous.
The Butterfinger Bomb Cake Dessert isn’t just a treat; it’s an event worthy of any occasion. Whether celebrating a birthday or simply honoring a Tuesday, this cake stands as a centerpiece. Its inviting appearance and sinfully delicious flavors promise to enchant friends and family alike, making you the star of every gathering.
Why You’ll Love This Butterfinger Bomb Cake Dessert
This delightful dessert captivates your senses and satiates your sweet cravings. The Butterfinger Bomb Cake Dessert offers a perfect blend of flavors that can’t be found in your average cake. The rich, chocolatey goodness provides a solid foundation, while the peanut butter filling elevates it into realms beyond ordinary desserts. Each mouthful is a balance of creaminess and crunch that dances on your palate, ensuring that every bite bursts with excitement.
Perfect for any occasion, this cake shines bright at birthday parties, potlucks, or simply as a special treat for yourself after a long day. Its charm lies not just in its taste, but also in its eye-catching appeal; the layers of chocolate cake and peanut butter filling, finished off with a generous swirl of chocolate frosting and adorned with crushed Butterfinger pieces, make this cake a showstopper. It’s a dessert that beckons you to indulge, making you come back for just one more slice—and with a recipe like this, who could blame you?
Preparation Phase & Tools to Use
To journey into the creation of this chocolate and peanut butter masterpiece, gather your essential tools. Each one plays a vital role in ensuring the Butterfinger Bomb Cake Dessert comes out perfectly luscious.
- Mixing Bowls: Having a few sizes handy allows for seamless ingredient mixing. Choose ones that are sturdy and easy to pour from.
- Electric Mixer: This will make whipping the cream a breeze. A hand mixer or stand mixer works wonderfully for achieving that perfect fluffy texture.
- Measuring Cups and Spoons: Precision is key in baking; having these tools ready means no last-minute scrambling!
- Cake Pans: Opt for two 9-inch round pans, as they create the ideal layer size and help the cakes bake evenly.
- Spatula: A sturdy spatula helps with smooth frosting application and mixing without losing volume in whipped ingredients.
Preparation Tips:
- Ensure eggs are at room temperature for better mixing.
- Grease and flour your pans generously to prevent sticking.
Ingredients for Butterfinger Bomb Cake Dessert
- 1 box of chocolate cake mix (plus ingredients required on the box—eggs, oil, water): This forms the rich, moist base of our cake.
- 1 cup creamy peanut butter: Choose a high-quality brand for the best taste; natural varieties work too.
- 1 cup powdered sugar: It sweetens the peanut butter filling, giving it that delightful, velvety finish.
- 1 cup heavy whipping cream: Whipping this creates a light, airy texture that balances the denser cake layers.
- 1 teaspoon vanilla extract: A splash adds warmth and enhances the overall flavor profile.
- 1 cup crushed Butterfinger candy bars (about 4-5 bars): This is the star ingredient, adding crunch and a burst of sweet flavor.
- 1 cup chocolate frosting: Store-bought or homemade, it provides a rich finish to this indulgent cake.
How to Make Butterfinger Bomb Cake Dessert
-
Preheat your oven to 350°F (175°C). This ensures an even baking temperature.
-
Prepare the batter: In a large bowl, combine the chocolate cake mix with the ingredients required on the box. Mix until just combined—over-mixing will lead to a denser texture.
-
Grease and flour two 9-inch round cake pans. This helps the cakes release easily after baking.
-
Divide the batter evenly between the prepared pans.
-
Bake for 25-30 minutes or until a toothpick inserted into the center comes out clean. Don’t open the oven door too soon; the sudden temperature change can cause your cakes to sink!
-
While the cakes bake: In another bowl, mix together the peanut butter and powdered sugar until smooth and well-combined.
-
Whip the heavy cream in a separate bowl until stiff peaks form. Gently fold this whipped cream into the peanut butter mixture until well-combined, then mix in the crushed Butterfinger pieces.
-
Let the cakes cool completely in the pans before transferring them to a wire rack. Once cooled, place one cake layer on a serving platter.
-
Spread the peanut butter filling generously over the first layer, then place the second layer on top.
-
Frost the entire cake with chocolate frosting. Use a spatula to smooth it out.
-
Garnish by sprinkling additional crushed Butterfinger pieces on top for that final touch of sweetness and crunch.
Chef’s Notes & Helpful Tips
- Make-ahead tips: You can prepare the cake layers a day in advance and store them wrapped in plastic wrap. Just assemble them when you’re ready to serve.
- Cooking alternatives: If you prefer, you can bake the cakes in an air fryer—just ensure to adjust the cooking time based on your air fryer’s specifications.
- Customization ideas: Add a layer of your favorite jam or caramel sauce between the cake layers for a fun twist! You could also swap the Butterfingers for other candy bars like Snickers or Twix for different flavor profiles.
Common Mistakes to Avoid
One common mistake is rushing the cooling process. Allowing the cakes to cool fully before assembling prevents the peanut butter filling from melting into the cake. Additionally, avoid over-mixing your batter, as this can lead to a dense cake instead of the light and fluffy texture we desire. Lastly, using cold heavy cream for whipping can prevent achieving the necessary volume—ensure it’s chilled for best results.
What to Serve With Butterfinger Bomb Cake Dessert
This delightful dessert pairs beautifully with a variety of accompaniments:
- Vanilla ice cream: The creaminess balances the richness of the cake.
- Chocolate drizzle: Add an extra layer of decadence to every slice.
- Whipped cream: Serve alongside for a light, airy contrast.
- Cup of coffee: A bitter cup enhances the sweet flavors without overwhelming the palate.
- Fresh berries: The tartness cuts through the sweetness, providing a refreshing contrast.
- Peanut butter drizzle: For the true peanut butter lovers, a drizzle can take it over the top.
Storage & Reheating Instructions
Store any leftover cake in an airtight container in the refrigerator for up to 5 days. For longer storage, freeze slices wrapped in plastic wrap and then placed in a freezer-safe container; they should keep for up to three months. When reheating, microwave individual slices for about 15-20 seconds to enjoy that freshly made taste.
Estimated Nutrition Information
(Approximate values per slice based on 12 servings)
- Calories: 450
- Fat: 25g
- Carbohydrates: 54g
- Protein: 6g
- Sugar: 35g
Disclaimer: Nutritional values may vary based on specific ingredients used and portion size.
FAQs
1. Can I use a different type of frosting?
Absolutely! While chocolate frosting complements the cake beautifully, feel free to experiment with cream cheese frosting or even a whipped ganache for an exciting variation.
2. Is it possible to make this cake gluten-free?
Yes! Substitute the chocolate cake mix with a gluten-free option, ensuring that the rest of the ingredients are also gluten-free.
3. How do I prevent the cake layers from sticking?
To prevent sticking, grease the pans generously and use parchment paper at the bottom of the pans before adding the batter. This method works wonders in ensuring a clean release.
4. Can I double the recipe for a larger gathering?
Yes! Simply double the ingredients and bake in larger pans or make three layers instead of two for a stunning presentation.
5. What if my cakes sink in the middle?
This often happens due to over-mixing or under-baking. Ensure you mix just until combined and check for doneness with a toothpick before removing the cakes from the oven.
Conclusion
As you gather around with friends and family, there’s something truly magical about sharing this Butterfinger Bomb Cake Dessert. It invites laughter, stories, and the joy of savoring something handmade and heartwarming. With a choco-peanut flavor explosion wrapped in luscious cream, this cake isn’t just a dessert; it’s an experience waiting to be shared. So grab your ingredients, preheat that oven, and get ready to create an unforgettable sweet moment that will be cherished by all who taste it. Happy baking!
Print
Butterfinger Bomb Cake Dessert
- Prep Time: 20 minutes
- Cook Time: 30 minutes
- Total Time: 50 minutes
- Yield: 12 servings 1x
- Category: Dessert
- Method: Baking
- Cuisine: American
- Diet: Vegetarian
Description
A rich and moist chocolate cake layered with creamy peanut butter filling and topped with crushed Butterfinger bars.
Ingredients
- 1 box of chocolate cake mix (plus eggs, oil, water as directed)
- 1 cup creamy peanut butter
- 1 cup powdered sugar
- 1 cup heavy whipping cream
- 1 teaspoon vanilla extract
- 1 cup crushed Butterfinger candy bars (about 4–5 bars)
- 1 cup chocolate frosting
Instructions
- Preheat your oven to 350°F (175°C).
- Prepare the batter: In a large bowl, combine the chocolate cake mix with the ingredients required on the box.
- Grease and flour two 9-inch round cake pans.
- Divide the batter evenly between the prepared pans.
- Bake for 25-30 minutes or until a toothpick inserted comes out clean.
- While the cakes bake, mix the peanut butter and powdered sugar together until smooth.
- Whip the heavy cream in a separate bowl until stiff peaks form, then fold into the peanut butter mixture along with crushed Butterfinger pieces.
- Let the cakes cool completely before transferring to a wire rack.
- Spread the peanut butter filling on the first cake layer, then place the second layer on top.
- Frost the entire cake with chocolate frosting and garnish with crushed Butterfinger pieces.
Notes
Ensure eggs are at room temperature for better mixing. You can prepare the cake layers a day in advance.
Nutrition
- Serving Size: 1 slice
- Calories: 450
- Sugar: 35g
- Sodium: 200mg
- Fat: 25g
- Saturated Fat: 10g
- Unsaturated Fat: 8g
- Trans Fat: 0g
- Carbohydrates: 54g
- Fiber: 2g
- Protein: 6g
- Cholesterol: 50mg