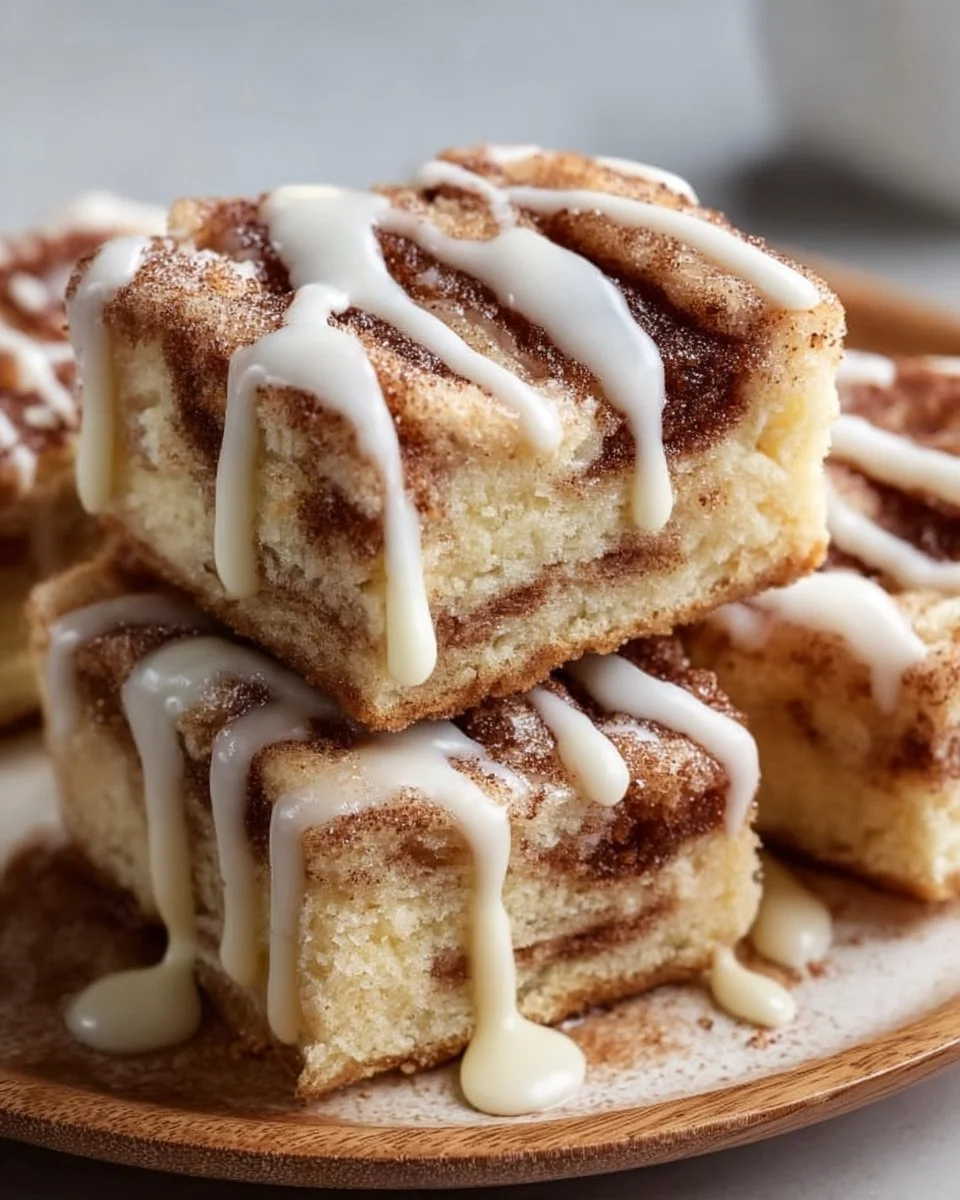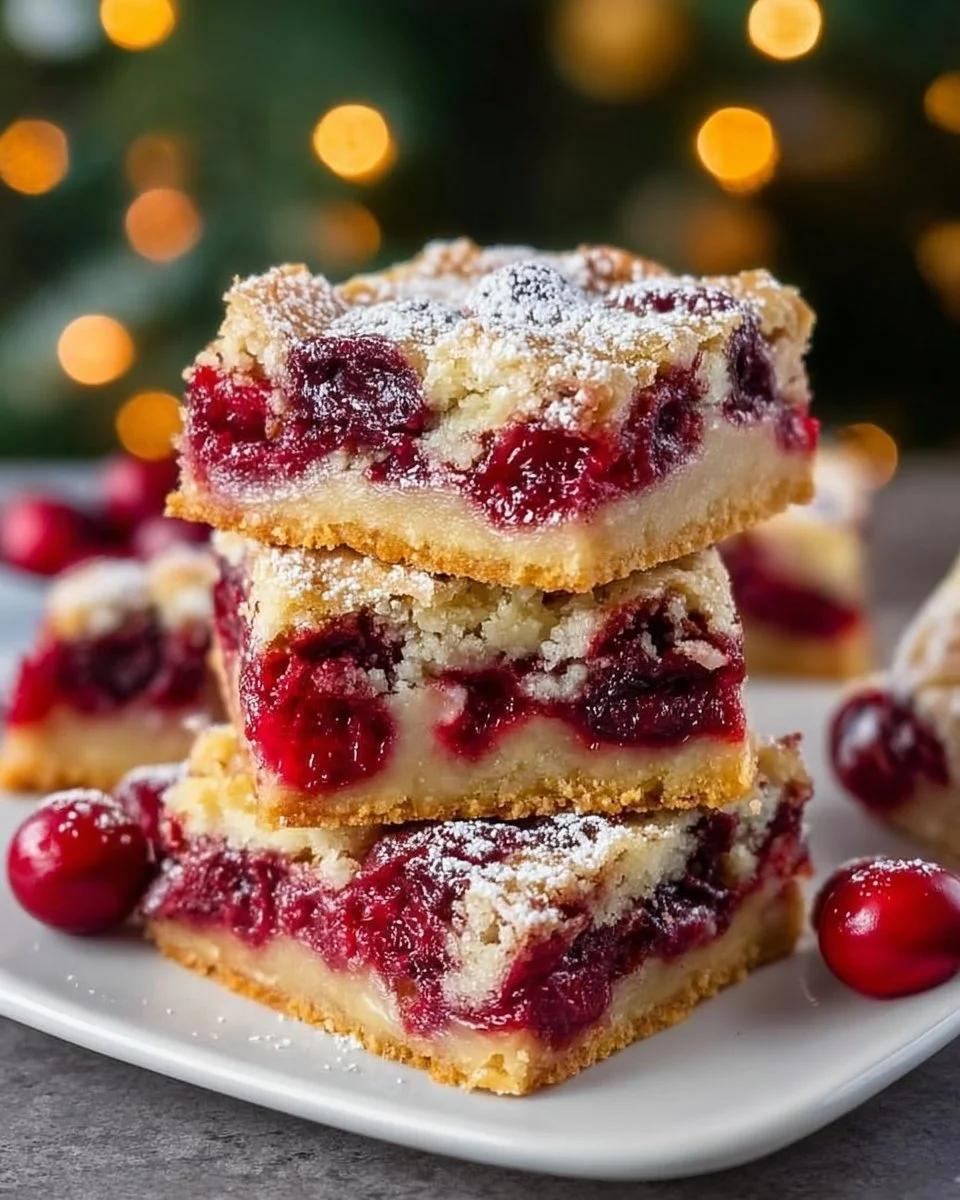
Each holiday season, as the air turns crisp and the scent of pine fills our homes, the kitchen transforms into a bustling haven of warmth and delight. This is when the magic of baking takes place, wrapping us in nostalgia and comfort. Among the countless sweet treats that grace holiday tables, Christmas Cherry Bars stand out like ruby jewels against a backdrop of festive cheer. Their sweet, buttery base provides a luscious foundation for the tart, vibrant cherry filling, creating a delightful contrast that sings of celebration. Every bite offers an enticing experience, with edges that boast a subtle crunch and a moist center that melts effortlessly in your mouth.
As the oven clock ticks down, the anticipation builds, filling your home with a sweet aroma that wraps around you like a cozy blanket. Imagine cutting into these rich, golden squares, just as you would slice into a cherished family recipe passed through generations. Each bar glistens with the vibrant red of cherry pie filling, offering a festive flourish perfect for holiday gatherings, casual family get-togethers, or simply to treat yourself on a chilly afternoon.
This dessert is more than just a festive indulgence; it brings people together. The delightful flavors evoke joyful memories of Christmases past, where laughter and chatter fill the air as guests reach for a sweet treat. Whether served warm with a scoop of vanilla ice cream or enjoyed as a midday snack with a hot cup of cocoa, these bars do more than satisfy your sweet tooth; they create moments of shared joy, making them an essential part of your holiday baking repertoire.
Why You’ll Love This Christmas Cherry Bars
Christmas Cherry Bars find a special place in your heart due to their perfect blend of flavors and textures. The combination of soft, buttery cake-like base pairs harmoniously with the sweet-tart cherries, creating a symphony of taste in every mouthful. Their vibrant color makes them not only a treat for the taste buds but also for the eyes, gracing your holiday table with cheer.
- Flexible Serving Options: These bars can serve double duty as a festive dessert or a delightful breakfast treat, especially when paired with coffee or tea.
- Make Ahead: Prepare these a day in advance to let the flavors deepen, making them even more irresistible.
- Customization: Don’t hesitate to experiment with different fillings. Consider adding fresh or mixed berries for a seasonal twist.
These bars are perfect for celebrations of all kinds—birthdays, family reunions, or simply enjoying with friends as the snow falls outside. Wherever you share them, they become a reminder of the warmth and sweetness of togetherness.
Preparation Phase & Tools to Use
To create your Christmas Cherry Bars with ease, gather a few essential kitchen tools that help the process flow smoothly:
- Mixing Bowls: A large mixing bowl allows for easy blending of ingredients, while a smaller bowl is perfect for combining the flour and salt.
- Electric Mixer: Achieve the ideal light and fluffy texture of your batter by using an electric mixer. This tool saves time and ensures your ingredients combine evenly.
- Baking Pan: A sturdy 9×13-inch baking pan provides the perfect size for even baking. Always grease it to prevent sticking.
- Wire Rack: After baking, a wire rack allows the bars to cool evenly, helping to maintain their texture.
Before you begin, read through the entire recipe to familiarize yourself with each step. Make sure your butter is softened to room temperature for easier mixing, and have all your ingredients measured and ready to go for a seamless baking experience.
Ingredients for Christmas Cherry Bars
- 1 cup butter (softened): This adds richness and moisture to the bars. For a dairy-free option, consider using vegan butter.
- 2 cups sugar: This is essential for sweetness and structure. You could substitute half with brown sugar for an added depth of flavor.
- 4 eggs: These provide binding and moisture. If you’re looking for an egg alternative, use flax eggs or applesauce.
- 1 tsp vanilla extract: Pure vanilla elevates the flavor; use imitation if necessary, though enhancements will be less robust.
- 3 cups all-purpose flour: The backbone of your bars, giving them structure. For a gluten-free option, substitute with a 1:1 gluten-free flour blend.
- 1 tsp salt: A small amount balances the sweetness of the cherries.
- 1 can cherry pie filling (21 ounces): The star of the dish! You could opt for fresh cherries in season, though jarred makes this recipe easy and convenient.
- 1 cup powdered sugar (for optional glaze): This adds a touch of sweetness and glossy finish.
- 2 tbsp milk (for optional glaze): Adjust the consistency of your glaze; almond or oat milk can also work well here.
- 1/2 tsp vanilla extract (for optional glaze): A hint of vanilla enhances the overall flavor of your glaze.
How to Make Christmas Cherry Bars
Creating these delightful bars is a simple joy that leads to delicious rewards. Follow these steps for perfect results:
-
Preheat your oven to 350°F (175°C). Greasing a 9×13-inch baking pan will help your bars come out perfectly without sticking.
-
In a large mixing bowl, cream together the softened butter and sugar using your electric mixer until the mixture turns light and fluffy. This process introduces air into the buttery blend.
-
Beat in the eggs one at a time, ensuring each is fully incorporated before adding the next. Pour in the vanilla extract and blend well, creating a sweet, aromatic batter.
-
In a separate bowl, whisk together the flour and salt. Gradually add this dry mixture to the butter mixture, mixing until just combined. Avoid over-mixing to keep the bars tender.
-
Spread 3 cups of the batter evenly across the bottom of the prepared pan, smoothing it to create a base.
-
Carefully layer the cherry pie filling over the batter, allowing its bright red hue to peek through.
-
Using the remaining batter, drop small clumps over the cherry layer, creating a beautiful mosaic of sweetness.
-
Bake for 35-40 minutes, or until the top becomes golden brown and a toothpick inserted in the center comes out clean.
-
Allow the bars to cool completely on a wire rack. This step is crucial for achieving the perfect texture.
-
While cooling, prepare an optional glaze by mixing powdered sugar, milk, and vanilla extract until smooth. Drizzle this over the cooled bars for a lovely finish.
-
Slice the bars into squares and enjoy the deliciousness!
Chef’s Notes & Helpful Tips
-
Make-ahead tips: Prepare the cherry bars a day before your event; they taste even better the next day as the flavors meld together.
-
Cooking alternatives: If you have an air fryer, you can bake these bars in batches—just ensure you adjust the baking time accordingly, about 20-30 minutes might suffice in an air fryer.
-
Customization ideas: Throw in some chopped nuts for added crunch, or swirl in cream cheese for a velvety richness.
Common Mistakes to Avoid
-
Dry Texture: Make sure not to overmix the batter; this will yield dense, dry bars instead of light, fluffy ones.
-
Underbaking: Keep an eye on baking times; spoil yourself by not serving undercooked bars.
-
Skipping the Cooling: Resist the urge to cut the bars immediately. Allowing them to cool ensures they hold their shape when sliced.
What to Serve With Christmas Cherry Bars
These delectable bars shine on their own, but pairing them can elevate your experience:
-
Vanilla Ice Cream: A scoop of vanilla ice cream creates a melty contrast with the warm bars.
-
Hot Cocoa: Cozy up with a steaming mug of hot cocoa for an ultimate comfort experience.
-
Whipped Cream: A dollop adds creaminess that beautifully balances the sweetness of the bars.
-
Coffee or Tea: These bars make a delightful afternoon treat to accompany your favorite hot beverage.
-
Fruit Salad: A fresh fruit salad adds a light touch to contrast the density of the bars.
-
Cheese Platter: Serve with a mix of soft cheeses for a delightful sweet and savory play.
-
Fruit preserves: Pair with apricot or raspberry preserves for an exciting flavor burst.
Storage & Reheating Instructions
Store your Christmas Cherry Bars in an airtight container at room temperature for up to four days. If you want to keep them longer, you may freeze the bars, ensuring they’re well-wrapped to prevent freezer burn. When ready to enjoy, simply thaw at room temperature, or if you prefer a warm treat, pop them in the microwave for 10-15 seconds.
Estimated Nutrition Information
Approximate values per bar (based on 24 servings):
- Calories: 180
- Total Fat: 7g
- Saturated Fat: 4g
- Cholesterol: 35mg
- Sodium: 100mg
- Total Carbohydrates: 28g
- Dietary Fiber: 1g
- Sugars: 15g
- Protein: 2g
Please note these values are estimates and can vary based on ingredient choices and portion sizes.
FAQs
Can I use fresh cherries instead of pie filling?
Absolutely! Fresh tart cherries offer a deliciously fresh flavor. Just be sure to pit and pit them beforehand, and you may need to add a bit of sugar for balance.
Can I make the bars gluten-free?
Yes. By substituting all-purpose flour with a gluten-free blend, you create a delicious gluten-free version that everyone can enjoy.
How do I know when the bars are done baking?
Look for a golden-brown top and do the toothpick test: insert a toothpick into the middle, and if it comes out clean or with a few moist crumbs, the bars are ready.
Can I add nuts to the recipe?
Certainly! Chopped walnuts or pecans add wonderful texture and flavor. Just mix them into the batter before spreading it in the pan.
What is the best way to slice the bars?
Use a sharp knife and cut the bars while they are cool to prevent crumbling. A warm knife makes cleaner cuts. If you prefer, you can also use a pizza cutter for quick slices.
Conclusion
Christmas Cherry Bars invite you to delight your senses and create enduring memories as you gather around with family and friends during the festive season. Each bite resonates with the warmth of the holidays, sweetening your celebrations with their inviting flavors. Embrace the joy of baking and share these delightful bars with loved ones, knowing that every slice is more than just a dessert—it’s a slice of holiday spirit. Go ahead and indulge in this scrumptious treat; you may just find it becomes a cherished part of your holiday tradition. So preheat that oven, roll up your sleeves, and let the sweet (and tart) symphony of flavors fill your home with joy this Christmas!
Print
Christmas Cherry Bars
- Prep Time: 15 minutes
- Cook Time: 40 minutes
- Total Time: 55 minutes
- Yield: 24 servings 1x
- Category: Dessert
- Method: Baking
- Cuisine: American
- Diet: Vegetarian
Description
Deliciously sweet and tart Christmas Cherry Bars with a buttery base and vibrant cherry filling, perfect for holiday gatherings.
Ingredients
- 1 cup butter (softened)
- 2 cups sugar
- 4 eggs
- 1 tsp vanilla extract
- 3 cups all-purpose flour
- 1 tsp salt
- 1 can cherry pie filling (21 ounces)
- 1 cup powdered sugar (for optional glaze)
- 2 tbsp milk (for optional glaze)
- 1/2 tsp vanilla extract (for optional glaze)
Instructions
- Preheat your oven to 350°F (175°C). Grease a 9×13-inch baking pan.
- Cream together the softened butter and sugar until light and fluffy.
- Beat in the eggs one at a time, followed by the vanilla extract.
- Whisk together the flour and salt in a separate bowl, then gradually add it to the butter mixture.
- Spread 3 cups of the batter in the bottom of the prepared pan.
- Layer the cherry pie filling over the batter.
- Drop small clumps of the remaining batter over the cherry layer.
- Bake for 35-40 minutes or until golden brown and a toothpick comes out clean.
- Cool completely on a wire rack.
- Mix powdered sugar, milk, and vanilla extract to prepare the optional glaze, then drizzle over the cooled bars.
- Slice into squares and enjoy!
Notes
These bars can be made a day in advance for deeper flavors and are flexible enough for various filling options.
Nutrition
- Serving Size: 1 bar
- Calories: 180
- Sugar: 15g
- Sodium: 100mg
- Fat: 7g
- Saturated Fat: 4g
- Unsaturated Fat: 2g
- Trans Fat: 0g
- Carbohydrates: 28g
- Fiber: 1g
- Protein: 2g
- Cholesterol: 35mg