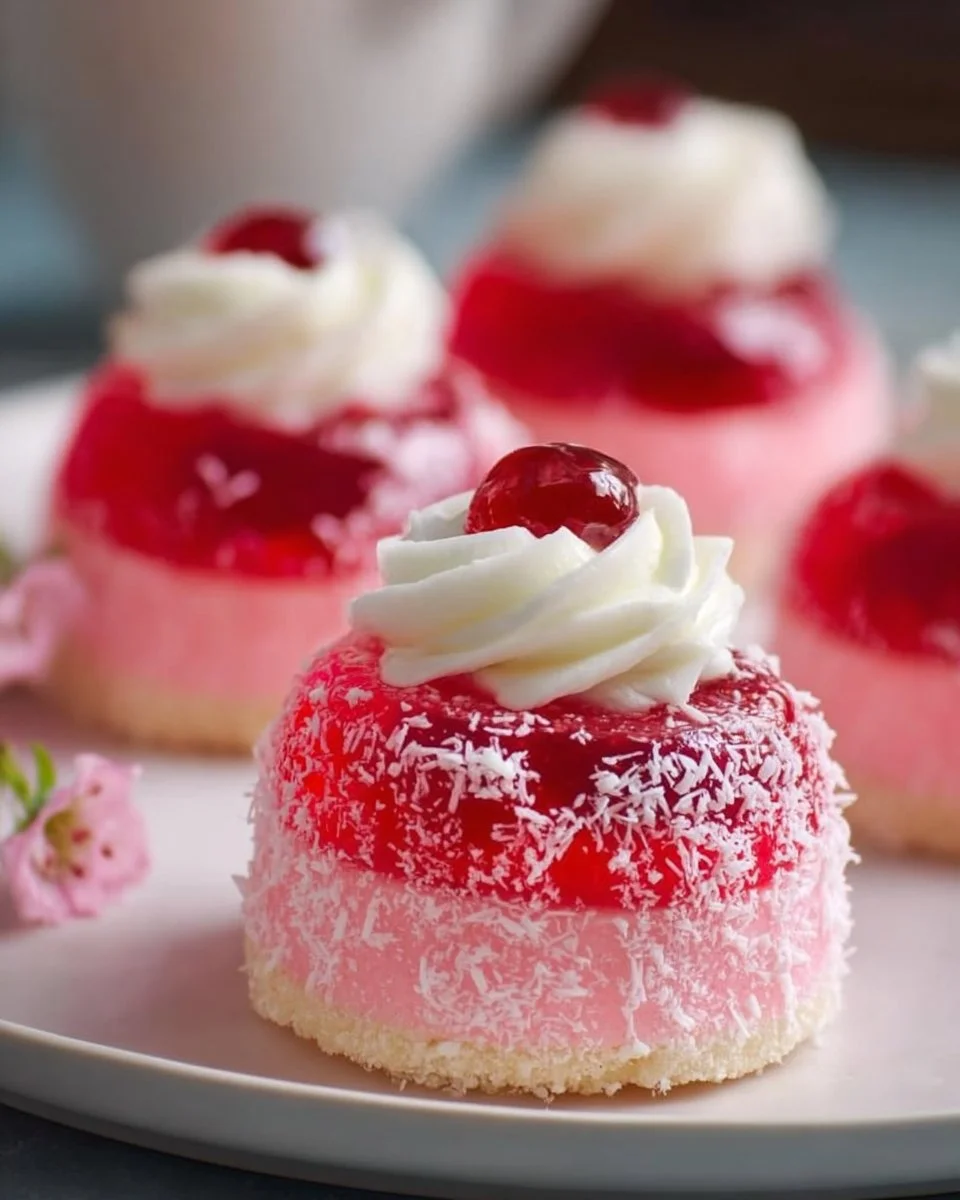
Old-Fashioned Pink Jelly Cakes, vibrant and delightful, hold a special place in the hearts of many. Their whimsical layers of spongy sweetness blended with the nostalgic flavors of summery treats evoke memories of childhood fairy tales. Imagine biting into a soft, airy cake that crumbles lightly, revealing a luscious layer of pink jelly and rich whipped cream. The sweet aroma wafts through your kitchen, reminiscent of family gatherings and celebrations. Each bite transports you back in time, making it feel like you’re indulging in a warm embrace—a comforting reminder that life is sweeter with cake.
These charming confections resemble little clouds, coated generously in shredded coconut. When you dip your fingers into the details of Old-Fashioned Pink Jelly Cakes, you uncover not just a treat but an experience. The jelly glistens, catching the light and alluring you with its jewel-like appearance, while the coconut covering adds a whimsical crunch that delights the palate. Sinking your teeth into the soft cake and jelly creates a heavenly combination of textures—creaminess meeting fluffiness in the most satisfying way possible.
Why You’ll Love This Old-Fashioned Pink Jelly Cakes
Indulging in Old-Fashioned Pink Jelly Cakes is like embarking on a mini culinary adventure filled with delightful discoveries. These cakes are charmingly versatile, perfect for afternoon tea parties, birthday celebrations, or simply as a special treat for yourself. Featuring a unique combination of flavors and textures, they readily appeal to both the young and the young at heart. The subtle sweetness of the cake pairs flawlessly with the vibrant strawberry jelly, invoking the delightful taste of summer. The fluffy whipped cream oozing from each layer adds a richness that makes the cakes irresistible.
What sets these cakes apart is their ability to evoke memories and create new ones. Whether you make them for a family gathering or as a delightful surprise for a loved one, these cakes always draw smiles. They serve more than just sweetness; they create an atmosphere of joy, sparking laughter and stories around the table. Plus, they are remarkably easy to whip up, making them an accessible yet extravagant-looking dessert. You’ll find yourself enchanted by the interplay of flavors that delight the senses, leaving you longing for just one more bite.
Preparation Phase & Tools to Use
To embark on your Pink Jelly Cakes adventure, gather a few essential tools to streamline your baking process.
- Mixing Bowls: A sturdy mixing bowl allows you to cream butter and sugar, ensuring a light and fluffy batter. Opt for a large bowl to accommodate all ingredients comfortably.
- Patty-Pan Tins: Use two 12-hole patty-pan tins for creating perfect little cakes. They provide the shape while maintaining consistency.
- Whisk & Spatula: A whisk helps incorporate air into your batter, while a spatula allows for gentle folding without deflating the mixture.
- Wire Rack: After baking, a wire rack promotes even cooling, preventing sogginess and preserving the cake’s texture.
Preparation Tips:
- Keep ingredients at room temperature for better incorporation and a smoother texture.
- Sift the flour to ensure a light and airy cake.
- Read through the recipe carefully before beginning to ensure a smooth experience.
Ingredients for Old-Fashioned Pink Jelly Cakes
- 80g butter, softened
- 1/2 cup (110g) caster sugar
- 1 tsp vanilla extract
- 1 egg
- 2/3 cup (160g) milk
- 1 cup (130g) self-raising flour, sifted
- 85g packet strawberry jelly crystals
- 1 cup (240g) boiling water
- 1 cup (240g) cold water
- 3 1/2 cups (280g) desiccated coconut
- 1 cup (240g) whipped cream
Each ingredient plays a crucial role in achieving the delightful layers and flavors:
- Butter and sugar create the base richness and sweetness of the cake. Use unsalted butter for flavor control.
- Vanilla extract adds a warm note that enhances the cake’s flavor profile—pure extract offers the best taste.
- Eggs bind everything together while providing moisture. For a vegan version, consider substituting with flax eggs or applesauce.
- Milk enhances moisture and softens the texture; dairy alternatives like almond or oat milk also work well.
- Self-raising flour contributes to the fluffiness. If unavailable, you can create a substitute with all-purpose flour and baking powder.
- The strawberry jelly crystals infuse vibrant flavor and color; any berry flavor will work if you’re feeling adventurous with seasonal variations.
- Desiccated coconut adds texture and a slight chewiness, making every bite more satisfying. Look for unsweetened versions to avoid overly sweet cakes.
- Finally, whipped cream gives that delightful creaminess that classic desserts deserve. You can opt for dairy or plant-based versions.
How to Make Old-Fashioned Pink Jelly Cakes
Embarking on this baking adventure is simple and rewarding. Here’s how to create these delightful treats step by step:
-
Preheat the oven to 175°C (fan-forced). Lightly grease two 12-hole patty-pan tins to ensure easy removal.
-
Cream the butter and sugar in a large bowl until pale and fluffy, about 3–4 minutes. This step is crucial for achieving the cake’s light texture. Add in the vanilla extract.
-
Beat in the egg until fully incorporated, mixing well to blend the flavors.
-
Gently fold in the milk and flour, incorporating them alternately in two batches: start with half the milk, then half the flour. Repeat until everything is combined. Use a folding motion to maintain airiness.
-
Spoon the batter into the prepared patty-pan holes, filling each just below the top. This allows room for the cakes to rise.
-
Bake for 15–18 minutes or until lightly golden and a skewer inserted into the center comes out clean. The aroma wafting through your kitchen will be irresistible!
-
Cool in tins for about 5 minutes before transferring to a wire rack to cool completely, which helps maintain their delicate texture.
-
Prepare the jelly: dissolve the jelly crystals in boiling water, stirring until fully dissolved. Then add in the cold water and refrigerate until partially set, usually about 1–2 hours.
-
Once the cake and jelly are ready, dip each cake into the partially set jelly using a slotted spoon, allowing excess to drip off.
-
Roll each cake in desiccated coconut while the jelly is still tacky.
-
Spoon whipped cream onto one half of a cake and sandwich it with another cake, creating the delightful layered effect.
-
Chill in the fridge for 30 minutes to set the jelly before serving for the perfect texture.
Chef’s Notes & Helpful Tips
-
Make-ahead tips: Prepare the cakes and jelly ahead of time, storing the cakes in an airtight container for up to three days before assembly.
-
Cooking alternatives: An air fryer can be used for a quicker option; adjust your temperature and time accordingly. Cakes may cook faster in the air fryer, so keep an eye on them.
-
Customize your creation: Add fresh fruit slices, or swap the jelly flavor for orange or raspberry for a fresh twist. Enhance sweetness with a drizzle of chocolate sauce or caramel for an indulgent touch.
Common Mistakes to Avoid
-
Underbaking: Ensure cakes are baked just to the point where a skewer comes out clean. Underbaked cakes can result in a soggy texture.
-
Over-mixing the batter: Avoid over-mixing after adding the dry ingredients. This overdevelopment of gluten can lead to a dense cake.
-
Allowing jelly to set too long: If the jelly sets fully before dipping, it becomes too firm to coat the cakes properly. Aim for a gelatin consistency that’s slightly wobbly.
What to Serve With Old-Fashioned Pink Jelly Cakes
Pair these delightful cakes with complementary flavors and arrangements for an enhanced experience:
- Earl Grey Tea: The bergamot notes contrast beautifully with the sweet cakes.
- Fresh Berries: A side of strawberries or raspberries adds a tartness that balances out the sweetness.
- Lemonade: The citrusy zing of lemonade cuts through the richness, refreshing the palate.
- Chocolate Sauce: A drizzle of rich chocolate adds an extra indulgent flavor to each bite.
- Mint Leaves: A sprinkle of mint elevates visual appeal and introduces a fresh, herbal note.
- Ice Cream: Serve alongside vanilla or strawberry ice cream for a decadent dessert experience.
- Sparkling Water: Infuse some citrus or berry flavor into sparkling water for a light and refreshing drink option.
Storage & Reheating Instructions
The joys of Old-Fashioned Pink Jelly Cakes do not have to be fleeting. Store them in an airtight container in the fridge for up to three days. If you’ve prepared the cakes without the jelly and cream, they can last up to a week.
For extended storage, consider freezing them. Wrap each cake individually in plastic wrap and place them in a freezer-friendly bag, lasting up to three months. When ready to enjoy, thaw them in the fridge overnight and add jelly and cream just before serving for the best taste and texture.
Estimated Nutrition Information
Each Pink Jelly Cake contains approximately:
- Calories: 150
- Total Fat: 7g
- Saturated Fat: 4g
- Carbohydrates: 21g
- Sugars: 9g
- Protein: 2g
Nutrition estimates may vary based on ingredient brands and specific measurements. For personalized dietary needs, calculate accordingly.
FAQs
1. Can I use fresh strawberries instead of jelly?
Absolutely! Fresh strawberries can provide a more natural fruit flavor. Simply slice the berries and layer them between the cakes, replacing the jelly in the recipe.
2. What other flavors work well with these cakes?
Feel free to experiment! Raspberry, blueberry, or even mango-flavored jelly can offer a fun twist while still maintaining the cake’s delightful texture.
3. How can I make these cakes gluten-free?
Substituting self-raising flour with a gluten-free flour blend works well, just ensure to follow the blend’s guidelines for egg substitute and liquid adjustments.
4. Can I make these cakes vegan?
Certainly! Use plant-based butter, almond milk, and substitute the egg with flaxseed mixed with water or a chia seed alternative to mimic the binding property.
5. What’s the best way to cut and serve these cakes?
Use a serrated knife to cut them into halves gently and place a layer of cream between them without squishing the cake layers.
Conclusion
Old-Fashioned Pink Jelly Cakes offer a beautiful blend of nostalgia and whimsy. Their layers of cake, jelly, and cream invite you to indulge and reflect on the sweet moments of life, reminding us of the importance of joy in the simple pleasures—like a lovely afternoon tea with friends or a heartfelt celebration with family. So roll up your sleeves, gather your loved ones, and dive into this delicious recipe. Trust me, once you taste these delightful cakes, they will earn a cherished spot in your go-to dessert repertoire. Happy baking!
Print
Old-Fashioned Pink Jelly Cakes
- Prep Time: 30 minutes
- Cook Time: 18 minutes
- Total Time: 60 minutes
- Yield: 12 servings 1x
- Category: Dessert
- Method: Baking
- Cuisine: American
- Diet: Vegetarian
Description
Delightful layers of spongy sweetness paired with vibrant strawberry jelly and whipped cream, reminiscent of childhood fairy tales.
Ingredients
- 80g butter, softened
- 1/2 cup (110g) caster sugar
- 1 tsp vanilla extract
- 1 egg
- 2/3 cup (160g) milk
- 1 cup (130g) self-raising flour, sifted
- 85g packet strawberry jelly crystals
- 1 cup (240g) boiling water
- 1 cup (240g) cold water
- 3 1/2 cups (280g) desiccated coconut
- 1 cup (240g) whipped cream
Instructions
- Preheat the oven to 175°C (fan-forced) and lightly grease two 12-hole patty-pan tins.
- Cream the butter and sugar in a large bowl until pale and fluffy, about 3–4 minutes.
- Beat in the egg until fully incorporated.
- Fold in the milk and flour alternately until combined.
- Spoon the batter into the prepared patty-pan holes, filling each just below the top.
- Bake for 15–18 minutes or until lightly golden.
- Cool in tins for about 5 minutes before transferring to a wire rack.
- Prepare the jelly by dissolving jelly crystals in boiling water, then add cold water and refrigerate until partially set.
- Dip each cake into the partially set jelly using a slotted spoon.
- Roll each cake in desiccated coconut while the jelly is still tacky.
- Spoon whipped cream onto one half of a cake and sandwich with another cake.
- Chill in the fridge for 30 minutes to set the jelly before serving.
Notes
Make these cakes ahead of time and store in an airtight container for up to three days before assembly. Customize with different jelly flavors or add fresh fruit slices.
Nutrition
- Serving Size: 1 cake
- Calories: 150
- Sugar: 9g
- Sodium: 50mg
- Fat: 7g
- Saturated Fat: 4g
- Unsaturated Fat: 3g
- Trans Fat: 0g
- Carbohydrates: 21g
- Fiber: 1g
- Protein: 2g
- Cholesterol: 30mg